 by
by Hello everyone, in this Robot Operating System version 2 tutorial, or briefly, ROS2 tutorial, we explain how to properly load and display URDF and Xacro model files in Gazebo. In particular, we explain how to
- Write simple URDF and Xacro robot models
- Write a Gazebo world file for embedding the model in a Gazebo 3D world
- Write Python launch files and ROS2 package that will properly set the ROS2 and Gazebo environments and that will load the model in Gazebo.
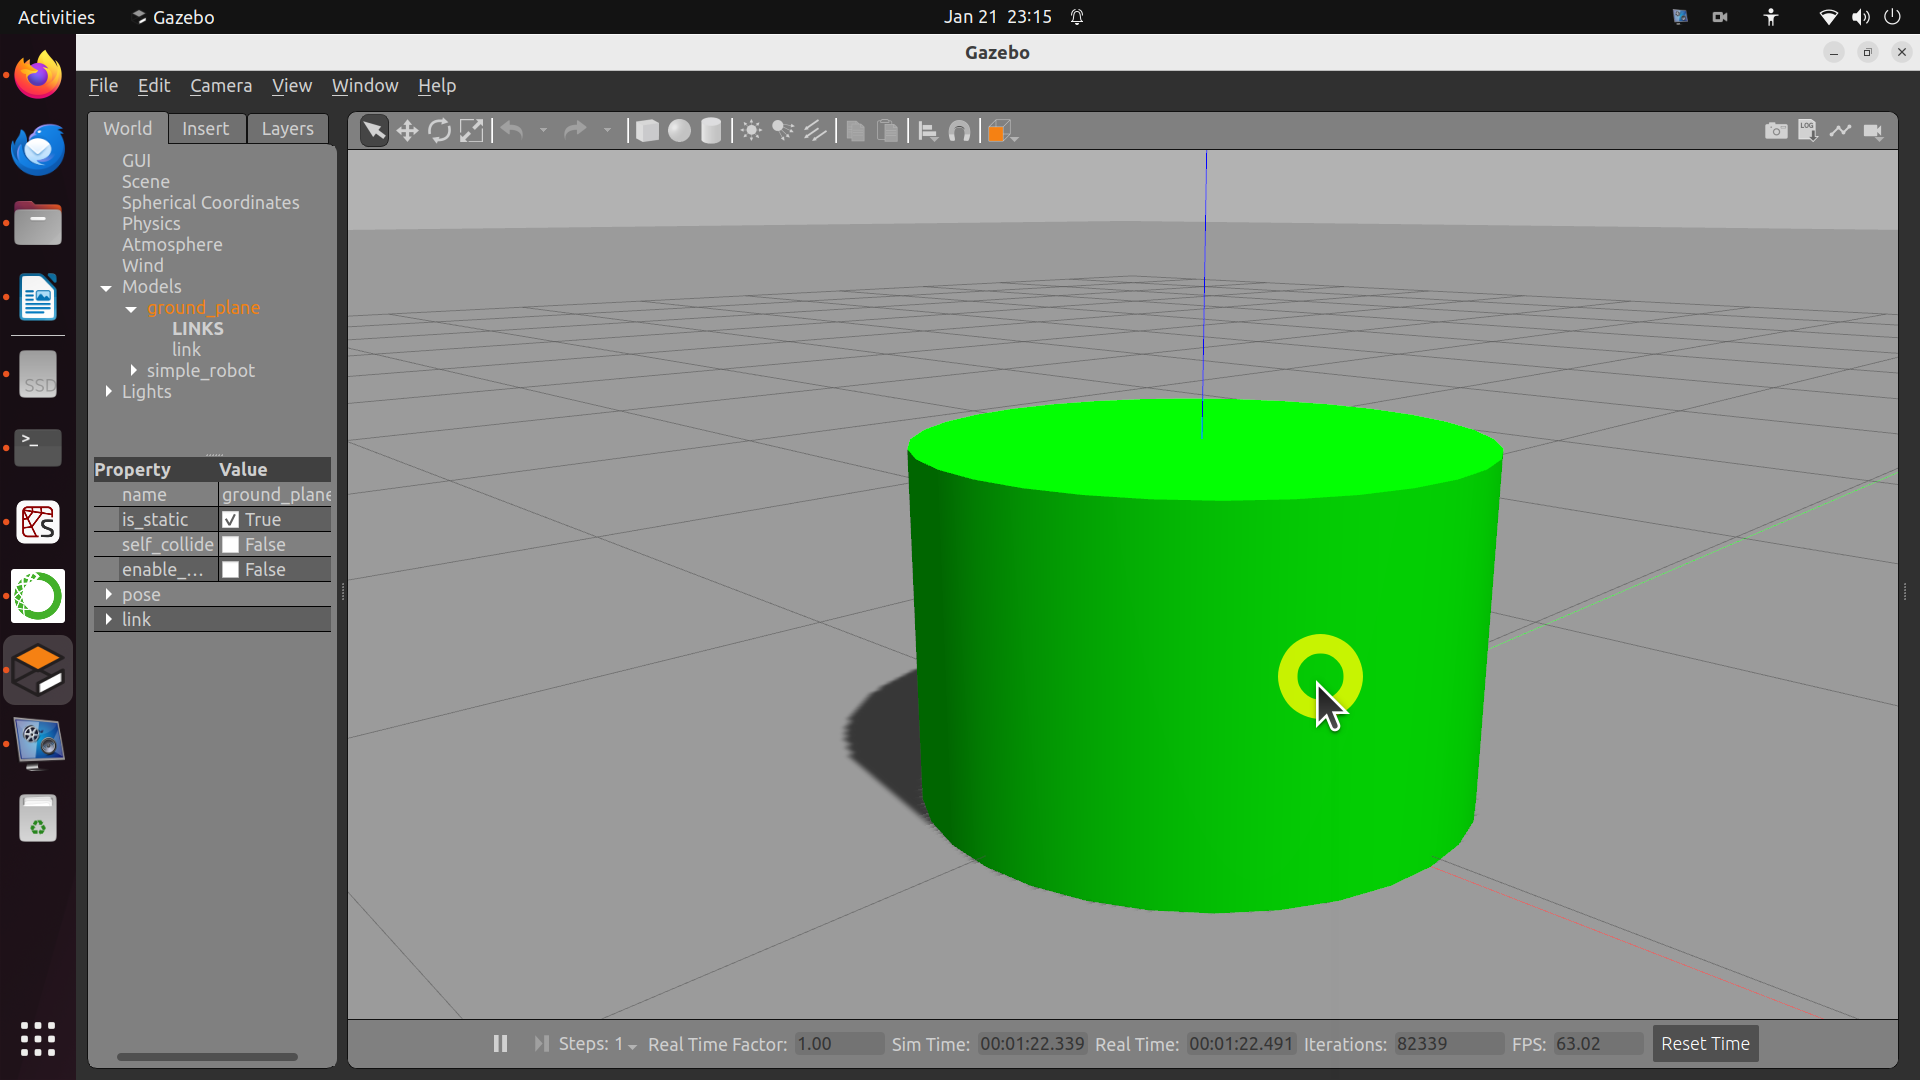
In this tutorial, we present a minimal working example of loading the model files in Gazebo. We deliberately stick to the simplest possible model and basic Gazebo and ROS2 configurations in order NOT to blur the main ideas with too many coding details. Even in this simplified form, the example covered in this tutorial might be challenging for complete beginners. However, we invested a significant amount of time and effort to present all the steps clearly. The final Gazebo model is shown below.
The YouTube video accompanying this page is given below.
Step 1: Double-check that you have the correct ROS2 and Linux distributions
Double-check that you have the correct combination of ROS2 and Linux distributions. The code presented in this tutorial will 100 percent work correctly in ROS2 Iron Irwini and Linux Ubuntu 22.04. In the tutorial given here, we explained how to install ROS2 Iron Irwini on Linux Ubuntu 22.04. To check the Linux distribution, open a terminal and type
cat /etc/os-releaseThis should print the installed Linux distribution. You should see Linux Ubuntu 22.04. Next, let us double-check the ROS2 version:
source /opt/ros/iron/setup.bash
printenv ROS_DISTRO
The output should be “iron”, which is an abbreviation for Iron Irwini. Everything explained in this tutorial will most likely work in other ROS2 distributions, however, instead of “iron” abbreviation in Linux and ROS2 commands you need to insert the correct abbreviation matching your ROS2 distribution. However, we strongly suggest you to install ROS2 Iron Irwini.
Step 2: Install the necessary packages
Open a new terminal, and type
source /opt/ros/iron/setup.bashto source the environment. Then, let us install the necessary packages
sudo apt-get update
sudo apt-get install gedit
sudo apt install ros-iron-joint-state-publisher
sudo apt install ros-iron-joint-state-publisher-gui
sudo apt install ros-iron-xacro
Next, we need to install Gazebo and its tools
sudo apt install ros-iron-gazebo-ros-pkgs
sudo apt install ros-iron-ros-core ros-iron-geometry2
Then, to check the installation, we type
gazeboand the main Gazebo window should open if Gazebo is installed properly. We can also double check that Gazebo is installed by typing:
ros2 pkg prefix gazebo_rosIf the package is installed, you should see the path to the package: “/opt/ros/iron”.
STEP 3: Create the workspace and package
Open a new terminal and source the environment:
source /opt/ros/iron/setup.bashCreate the workspace folders
mkdir -p ~/ws_gazebo/srcHere, “ws” stands for workspace and “gazebo” is the name. You can also use some other name for the workspace folder. However, everywhere in the code you need to use that name. Next, we create and build the workspace:
cd ~/ws_gazebo/
colcon build
Next, we need to create the package:
cd ~/ws_gazebo/src
ros2 pkg create --build-type ament_cmake gazebo_test
The name of the package is “gazebo_test”. The package source files and folders will be in the folder ~/ws_gazebo/src/gazebo_test/. Consequently, let us navigate to that folder and let us create several subfolders
cd ~/ws_gazebo/src/gazebo_test/
mkdir launch model
The launch folder will contain the Python lunch file necessary to run the model in Gazebo. The model folder will contain the Xacro and URDF source file of the model, as well as a Gazebo empty world model that is used an environment. Note that URDF stands for “Unified Robotics Description Format”. This is a file format that is used to specify the geometry of robots and some other properties. Xacro is an XML macro language used to parametrize and simplify URDF model development. Let us now build the complete workspace once more. To build the workspace and packages, you need to navigate to the source folder of the workspace:
cd ~/ws_gazebo/
colcon build
Step 4: Create the URDF, Xacro, and Gazebo World Files
First, we will create the robot model. We create the robot model by creating two files. The first Xacro file contains the robot 3D model, and the second Gazeo file contains additional parameters necessary to successfully represent the model in Gazebo. First, let us navigate to the model folder
cd ~/ws_gazebo/src/gazebo_test/modelCreate the Xacro model file defining the geometry:
gedit robot.xacroAnd enter the content of the file
<?xml version="1.0"?>
<robot xmlns:xacro="http://www.ros.org/wiki/xacro" name="simple_robot">

<!-- Here we define the model parameters  -->

<!-- Geometry  -->

<xacro:property name="base_link_length" value="0.5"/>
<xacro:property name="base_link_radius" value="0.4"/>


<!-- Include the Gazebo definitions  -->

<xacro:include filename="$(find gazebo_test)/model/robot.gazebo" />

    <link name="dummy">
    </link>

    <joint name="dummy_joint" type="fixed">
    <parent link="dummy"/>
    <child link="base_link"/>
    </joint>


	<link name="base_link">
		<visual>
			<geometry>
				<cylinder length="${base_link_length}"
				radius="${base_link_radius}"/>
			</geometry>

			<!--origin - the reference frame of the visual element with respect to the reference frame of the link -->
			<!-- rpy - r is roll, p-pitch and y -yaw -->
			<!-- xyz - x,y,z -offsets  -->
			<origin rpy="0 0 0" xyz="0 0 0"/>

		</visual>

		<collision>
			<geometry>
				<cylinder length="${base_link_length}"
				radius="${base_link_radius}"/>
			</geometry>
			<origin rpy="0 0 0" xyz="0 0 0"/>
		</collision>

		<inertial>
			<origin rpy="0 0 0" xyz="0 0 0"/>
			<mass value="1"/>
			<inertia ixx="100" ixy="0" ixz="0" iyy="100" iyz="0" izz="100" />
		</inertial>

	</link>


</robot>
Then, create an additional Gazebo file that is included in the above Xacro file:
gedit robot.gazeboEnter the content of the file:
<?xml version="1.0"?>
<robot>
<gazebo>
	<plugin name="gazebo_ros_control" filename="libgazebo_ros_control.so">
		<robotNamespace>/simple_robot </robotNamespace>
	</plugin>
</gazebo>

<gazebo reference="base_link">
<mu1>0.2</mu1>
<mu2>0.2</mu2>
<material>Gazebo/Green</material>
</gazebo>


</robot>
Then, create a Gazebo world file
gedit empty_world.worldand enter the content of the file
<?xml version="1.0" ?>

<sdf version="1.5">
	<world name="Empty world">
		<!-- Light source -->
		<include>
			<uri>model://sun</uri>
		</include>

		<!-- This is the ground plane -->
		<include>
			<uri>model://ground_plane</uri>
		</include>
	</world>
</sdf>
STEP 5: Create the Python launch file
We create the launch file in the “launch” folder. Let us navigate to the folder
cd ~/ws_gazebo/src/gazebo_test/launchCreate and edit the file
gedit gazebo_model.launch.pyinsert the content of the file
import os
from ament_index_python.packages import get_package_share_directory
from launch import LaunchDescription
from launch.actions import IncludeLaunchDescription
from launch.launch_description_sources import PythonLaunchDescriptionSource


from launch_ros.actions import Node
import xacro


def generate_launch_description():

    # this name has to match the robot name in the Xacro file
    robotXacroName='simple_robot'

    # this is the name of our package, at the same time this is the name of the
    # folder that will be used to define the paths
    namePackage = 'gazebo_test'

    # this is a relative path to the xacro file defining the model
    modelFileRelativePath = 'model/robot.xacro'
    # this is a relative path to the Gazebo world file
    worldFileRelativePath = 'model/empty_world.world'

    # this is the absolute path to the model
    pathModelFile = os.path.join(get_package_share_directory(namePackage),modelFileRelativePath)

    # this is the absolute path to the world model
    pathWorldFile = os.path.join(get_package_share_directory(namePackage),worldFileRelativePath)
    # get the robot description from the xacro model file
    robotDescription = xacro.process_file(pathModelFile).toxml()


    # this is the launch file from the gazebo_ros package
    gazebo_rosPackageLaunch=PythonLaunchDescriptionSource(os.path.join(get_package_share_directory('gazebo_ros'),
                                                                       'launch','gazebo.launch.py'))

    # this is the launch description
    gazeboLaunch=IncludeLaunchDescription(gazebo_rosPackageLaunch,launch_arguments={'world': pathWorldFile}.items())

    # here, we create a gazebo_ros Node
    spawnModelNode = Node(package='gazebo_ros', executable='spawn_entity.py',
                          arguments=['-topic','robot_description','-entity', robotXacroName],output='screen')

    # Robot State Publisher Node
    nodeRobotStatePublisher = Node(
        package='robot_state_publisher',
        executable='robot_state_publisher',
        output='screen',
        parameters=[{'robot_description': robotDescription,
        'use_sim_time': True}]
    )


    # here we create an empty launch description object
    launchDescriptionObject = LaunchDescription()

    # we add gazeboLaunch
    launchDescriptionObject.add_action(gazeboLaunch)

    # we add the two nodes
    launchDescriptionObject.add_action(spawnModelNode)
    launchDescriptionObject.add_action(nodeRobotStatePublisher)

    return launchDescriptionObject
STEP 6: Final adjustments and run the model
Next, we need to add the dependencies
cd ~/ws_gazebo/src/gazebo_test
gedit package.xml
Add these lines to “package.xml”
<exec_depend>joint_state_publisher</exec_depend>
<exec_depend>robot_state_publisher</exec_depend>
<exec_depend>gazebo_ros</exec_depend>
<exec_depend>xacro</exec_depend>
Then, we need to adjust the CMakeLists.txt file. We need to tell to ROS2 that important files are in the two new folders “launch” and “model”
cd ~/ws_gazebo/src/gazebo_test
gedit CMakeLists.txt
Then, above “if(BUILD_TESTING)”, type the following
install(
  DIRECTORY launch model
  DESTINATION share/${PROJECT_NAME}
)
Next, we need to perform one final build of the workspace and the package
cd ~/ws_gazebo
colcon build
Then, we need to source the package. That is we need to create an overlay
source ~/ws_gazebo/install/setup.bashFinally, we are ready to launch the model:
ros2 launch gazebo_test gazebo_model.launch.py