by
by In this computer vision, robotics, and OpenCV tutorial, we explain how to detect an object in a scene by using feature matching. Before we start with explanations, we have to mention that there are a number of approaches for detecting objects in a scene. Feature matching is just one of the approaches. It might not be the most optimal or most advanced approach, however, it is an approach that you should know and that serves as a building block of more advanced and efficient object detection methods. We will cover other approaches in our future tutorials. By the end of this tutorial, you will be able to locate a lighter in a scene shown below.
The YouTube video accompanying this tutorial is given below.
How to Detect an Object in a Scene Using Brute-Force Matcher Approach and ORB
To detect an object in a scene, we have to have two images. The first image is the image of the object that we want to locate. The second image is the image of the scene in which the object is located. The image of the object is called a query image. The scene image is called the train image. The object detection algorithms extract useful image features from the query and scene images and try to mathematically compare and find similarities between the extracted features. Generally speaking, image features are areas or sections of images that are easily recognizable. There are a number of types of features. Some of the common features are edges, corners, and blobs (a section of an image that is significantly different from its surroundings). On the other hand, the patterns that repeat themselves, such as a blue sky, are not useful features.
There are two important concepts that we need to understand in order to apply the feature-matching method. The first concept is the concept of a keypoint, and the second concept is the concept of a descriptor.
- Keypoint is a point representation of a small portion of an image that is distinctive and that can be located in another related image.
- Descriptor is a mathematical description of the keypoint, and which can be used to determine if two keypoints in two different images are the same or not.
In the sequel, we explain how to use keypoints and descriptors for feature matching. We use the brute-force matcher to match features in two images, and the ORB algorithm for detecting features (keypoints and descriptors).
As a test case, we use the images shown below. The first image (query image) is given below.
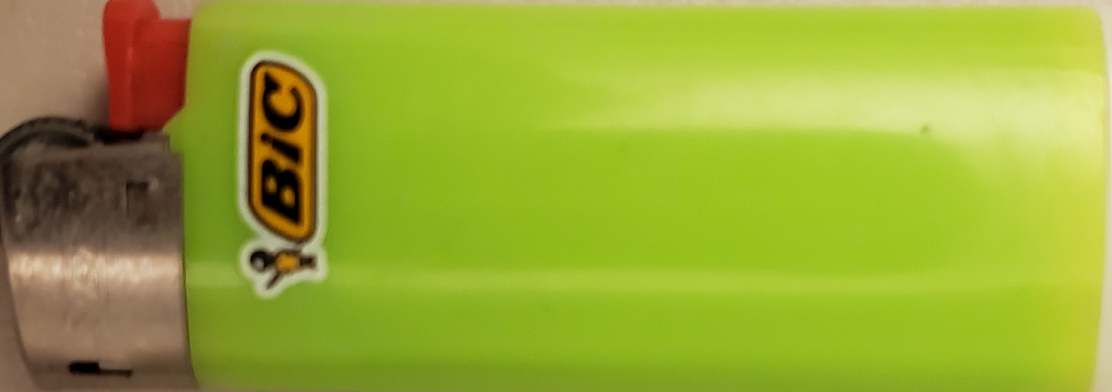
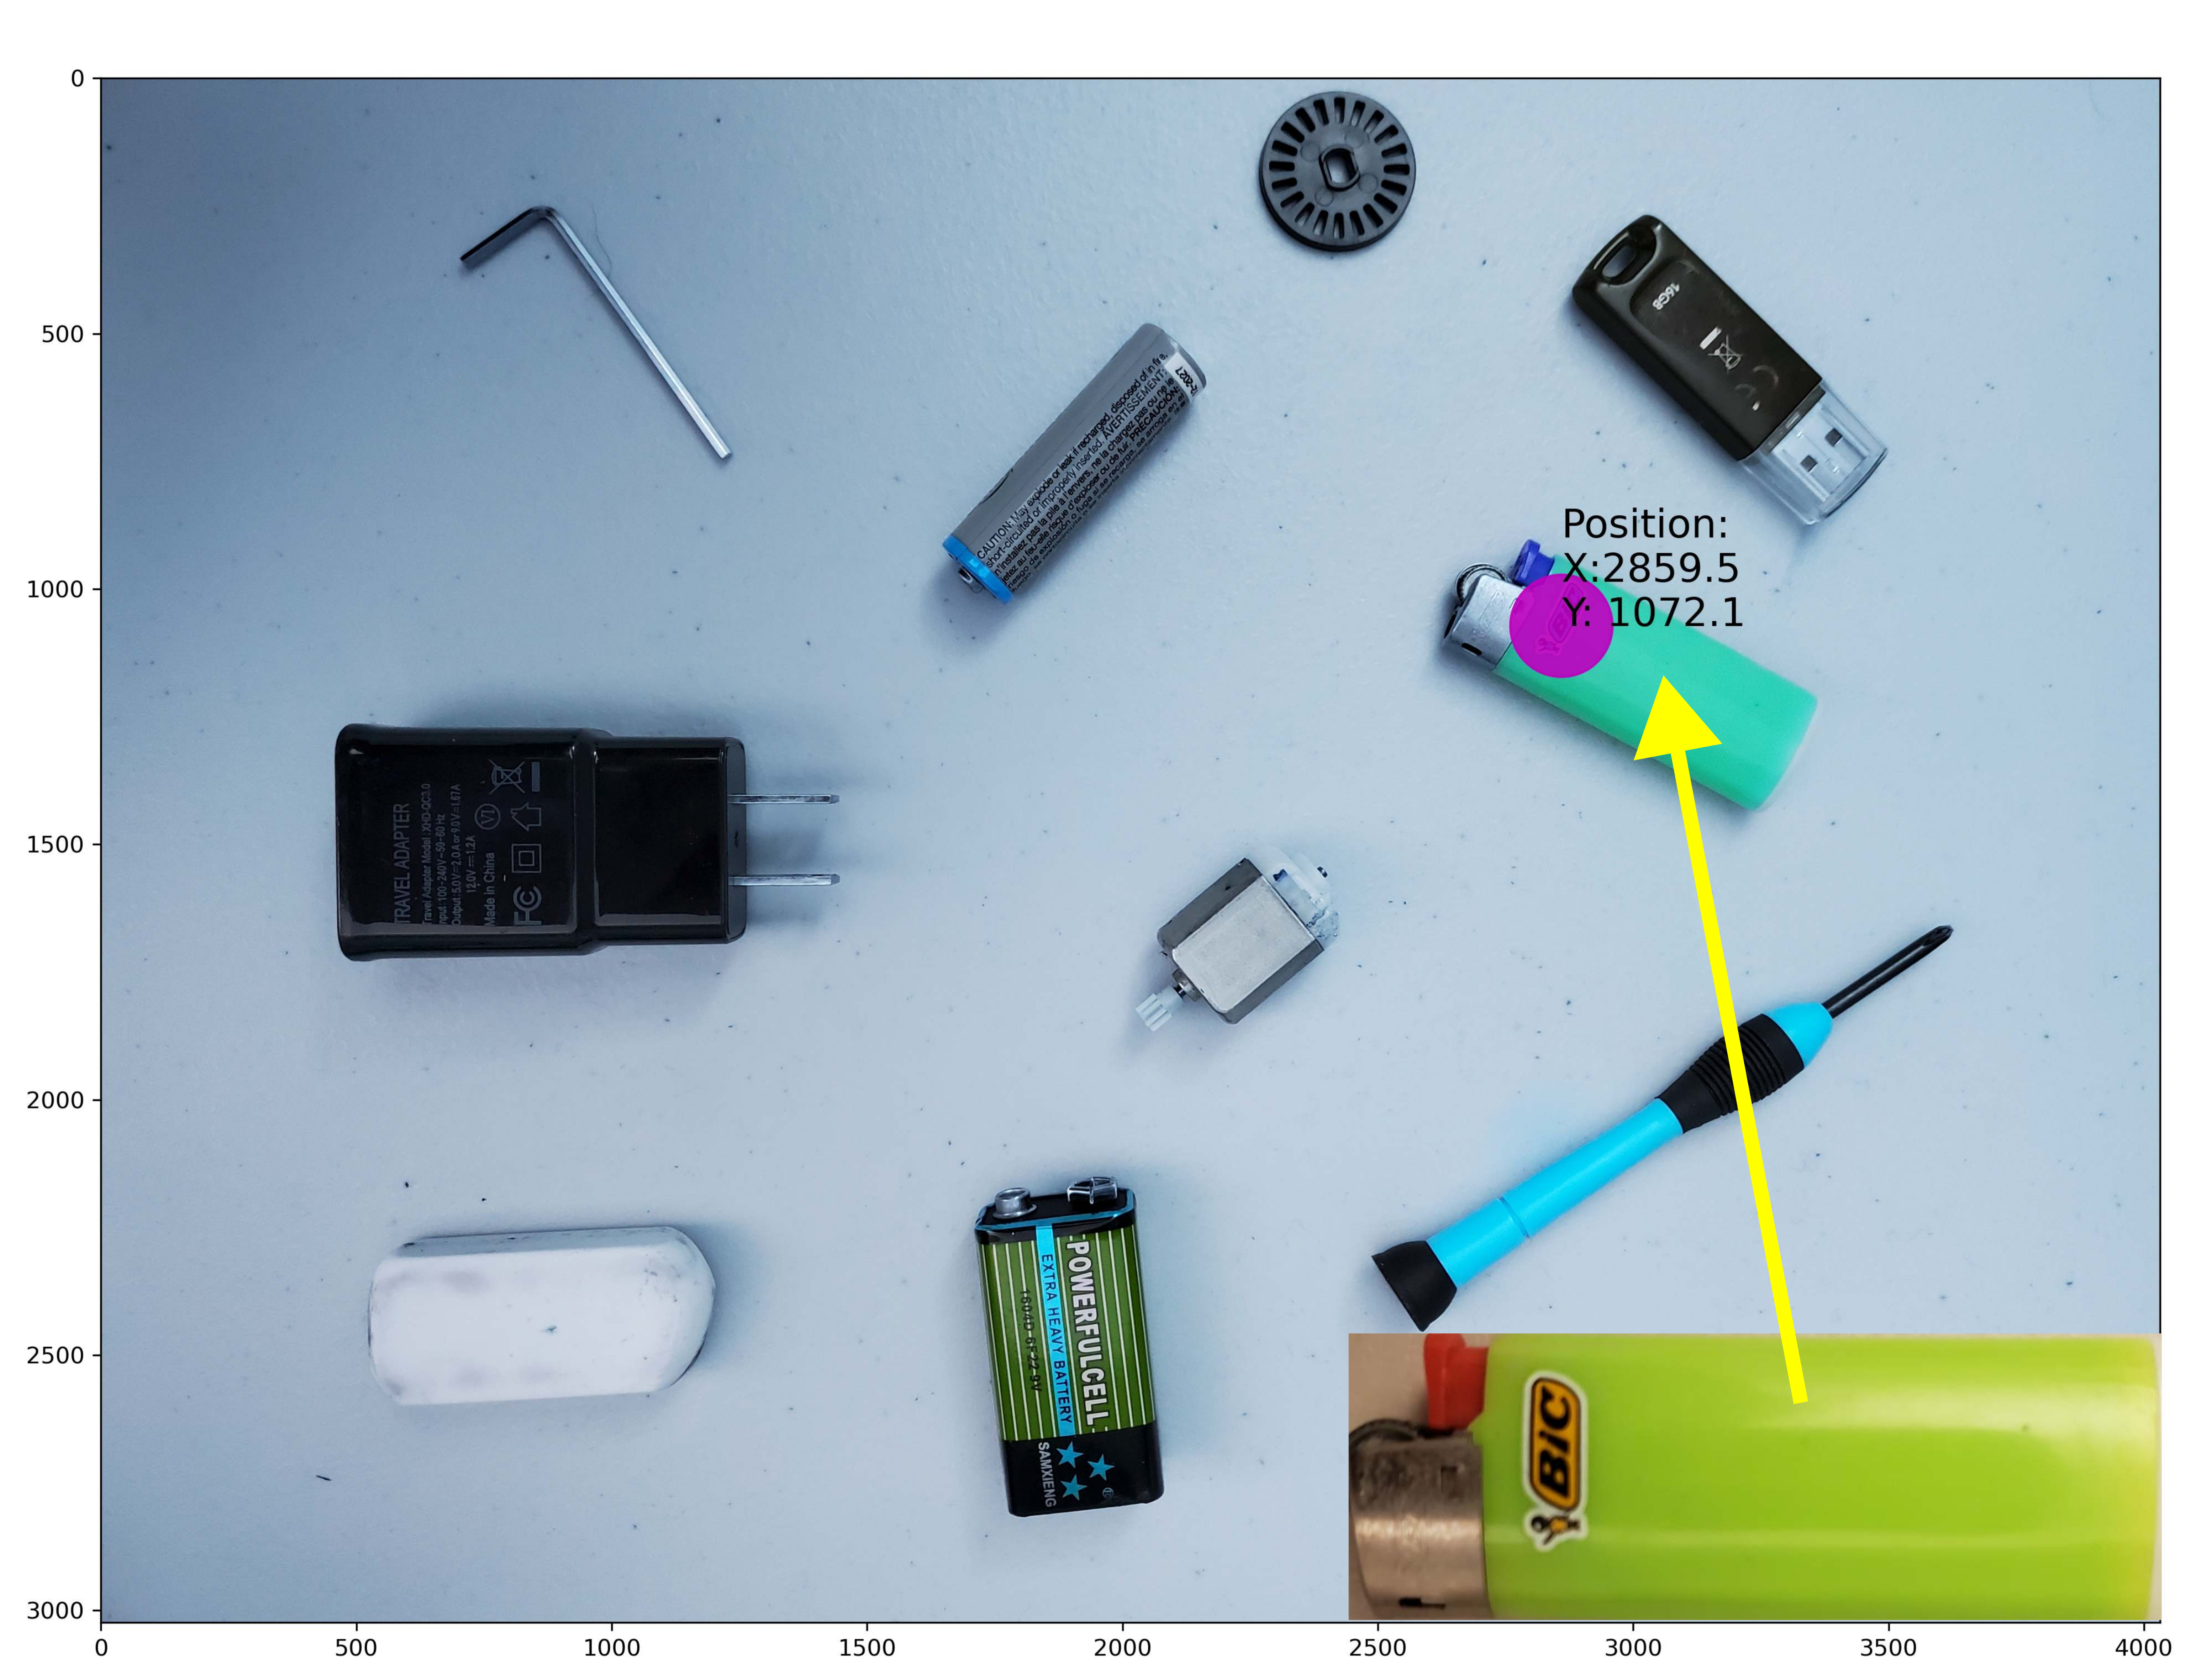
It is an image of a lighter. The second image (scene image) is given below.

We can observe several objects in the scene image. Our goal is to detect the lighter in this image. Also, we will determine the geometrical location of the lighter keypoints and show them on the scene image. You can freely download both images.
The Python script given below imports the necessary libraries, loads the query and scene images, creates the ORB detector, and determines the keypoints and descriptors by using the ORB algorithm.
# Demonstration of the Feature Matching in OpenCV

# Author: Aleksandar Haber

# Date: December 2023

import numpy as np
import cv2
import matplotlib.pyplot as plt

# we have two images:
# (1) query image
# (2) train image
# this is the query image - that is, the image of the object that we want to
# find
queryImage = cv2.imread('object1.jpg',cv2.IMREAD_GRAYSCALE)
# this is the train image - the image of the scence
sceneImage = cv2.imread('scene1.jpg',cv2.IMREAD_GRAYSCALE)

# Initiate ORB detector
orbDetector = cv2.ORB_create()

# determine keypoints and descriptors by using the ORB algorithm

keyPointQuery, descriptorsQuery = orbDetector.detectAndCompute(queryImage,None)
keyPointScene, descriptorsScene = orbDetector.detectAndCompute(sceneImage,None)
We use the function “cv2.imread” to read the query and scene images. The images are read as grayscale images. We create the ORB detector by using the function “cv2.ORB_create()”. Next, we calculuate the keypoints and descriptors by using the function “orbDetector.detectAndCompute()”.
Next, we use the brute-force matcher to match descriptors of features. Then, we sort the detected descriptors and show the first 10 matches.
# we use the Brute-force matcher
# create the BFMatcher object
bf = cv2.BFMatcher(cv2.NORM_HAMMING, crossCheck=True)

# Here we compute the matches by using the brute force approach
detectedMatches = bf.match(descriptorsQuery,descriptorsScene)

# sort the detected matches
sortedDetectedMatches = sorted(detectedMatches, key = lambda x:x.distance)

# Show first 10 matches.
combinedImage = cv2.drawMatches(queryImage,keyPointQuery,
                       sceneImage,keyPointScene,
                       sortedDetectedMatches[:10],None,flags=2)

plt.figure(figsize=(16,16))
plt.imshow(combinedImage)
plt.savefig('DetectedImage1.png',dpi=600)
plt.show()
The brute force match algorithm works like this. It selects a descriptor of one feature in the first set, and compares this descriptor with all descriptors from another set. As a comparison, we use a distance measure. In our case, we are using the Hamming distance. We create the brute force match object by using “cv2.BFMatcher()”. The first argument is the type of the distance measure. The second is a boolean variable for performing the cross-check. We compute the matches by using “match()”. The inputs of this function are the descriptors of the query and scene images. After we compute the matches, we sort the detected matches by using the norm distance as the sorting criterion, and finally, we use the function “cv2.drawMatches()” to draw the matches on a single image. The result is given below.
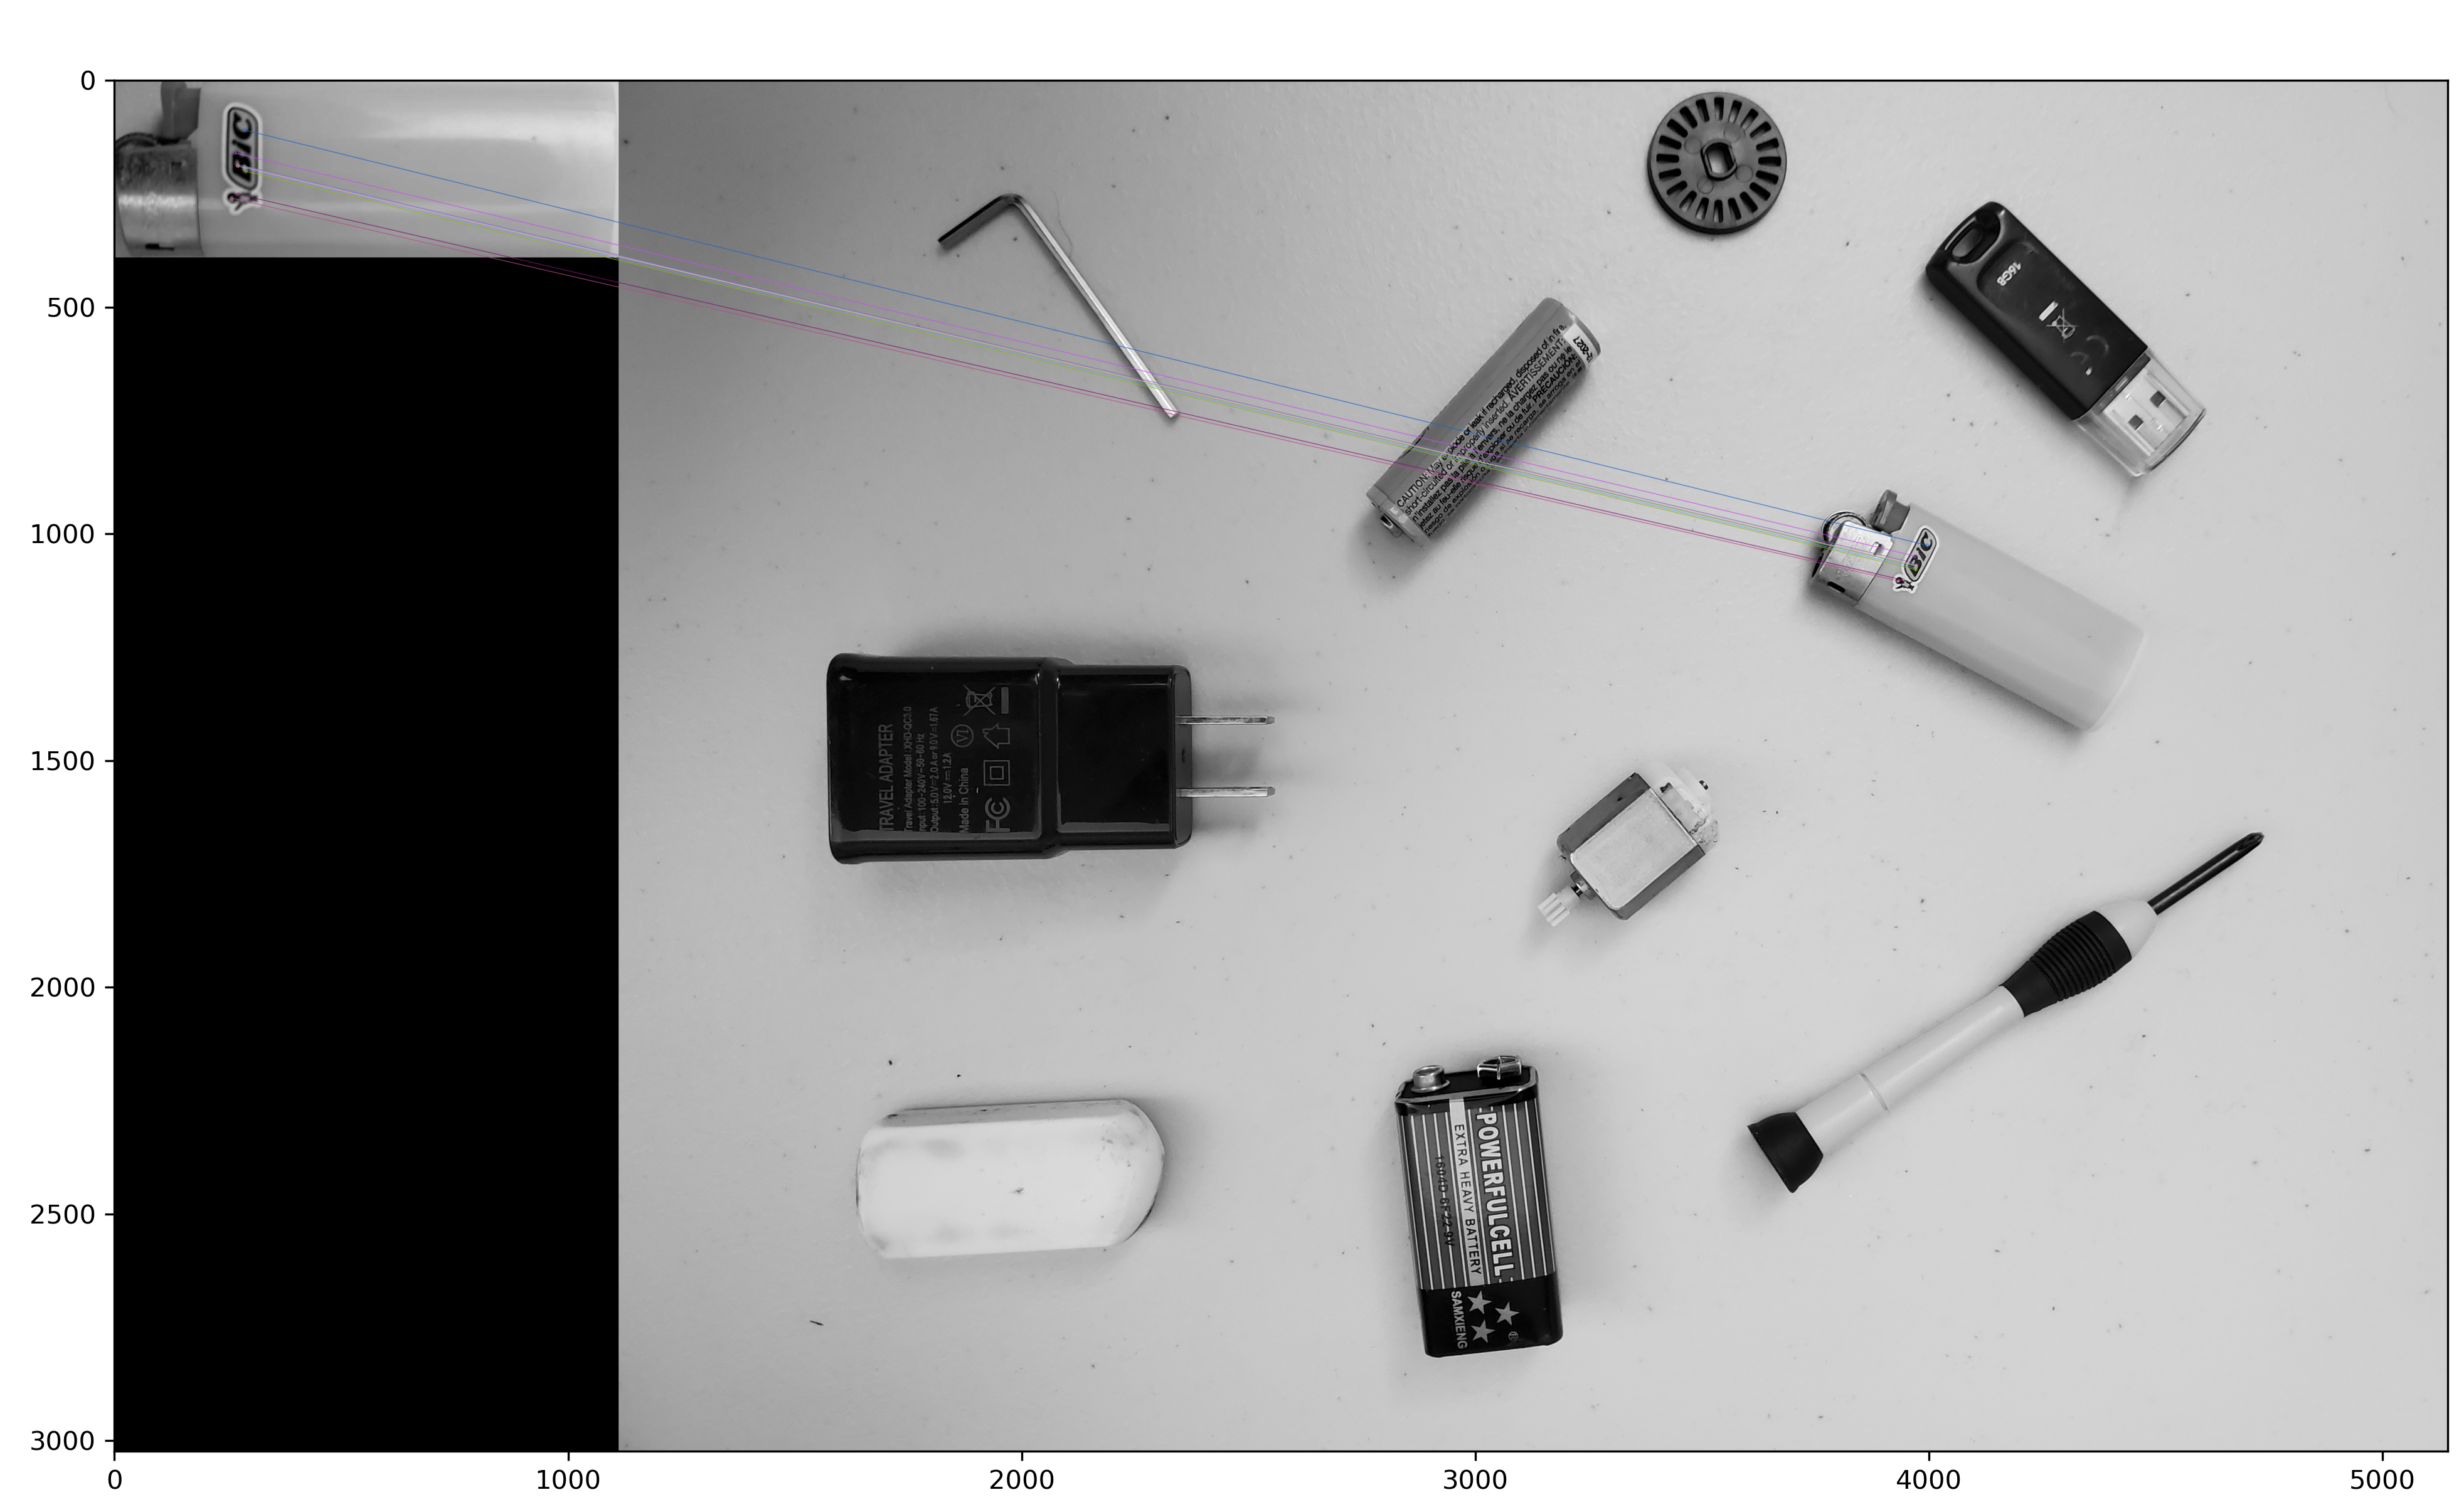
We can see that we are able to correctly detect the features of the object in the scene image.
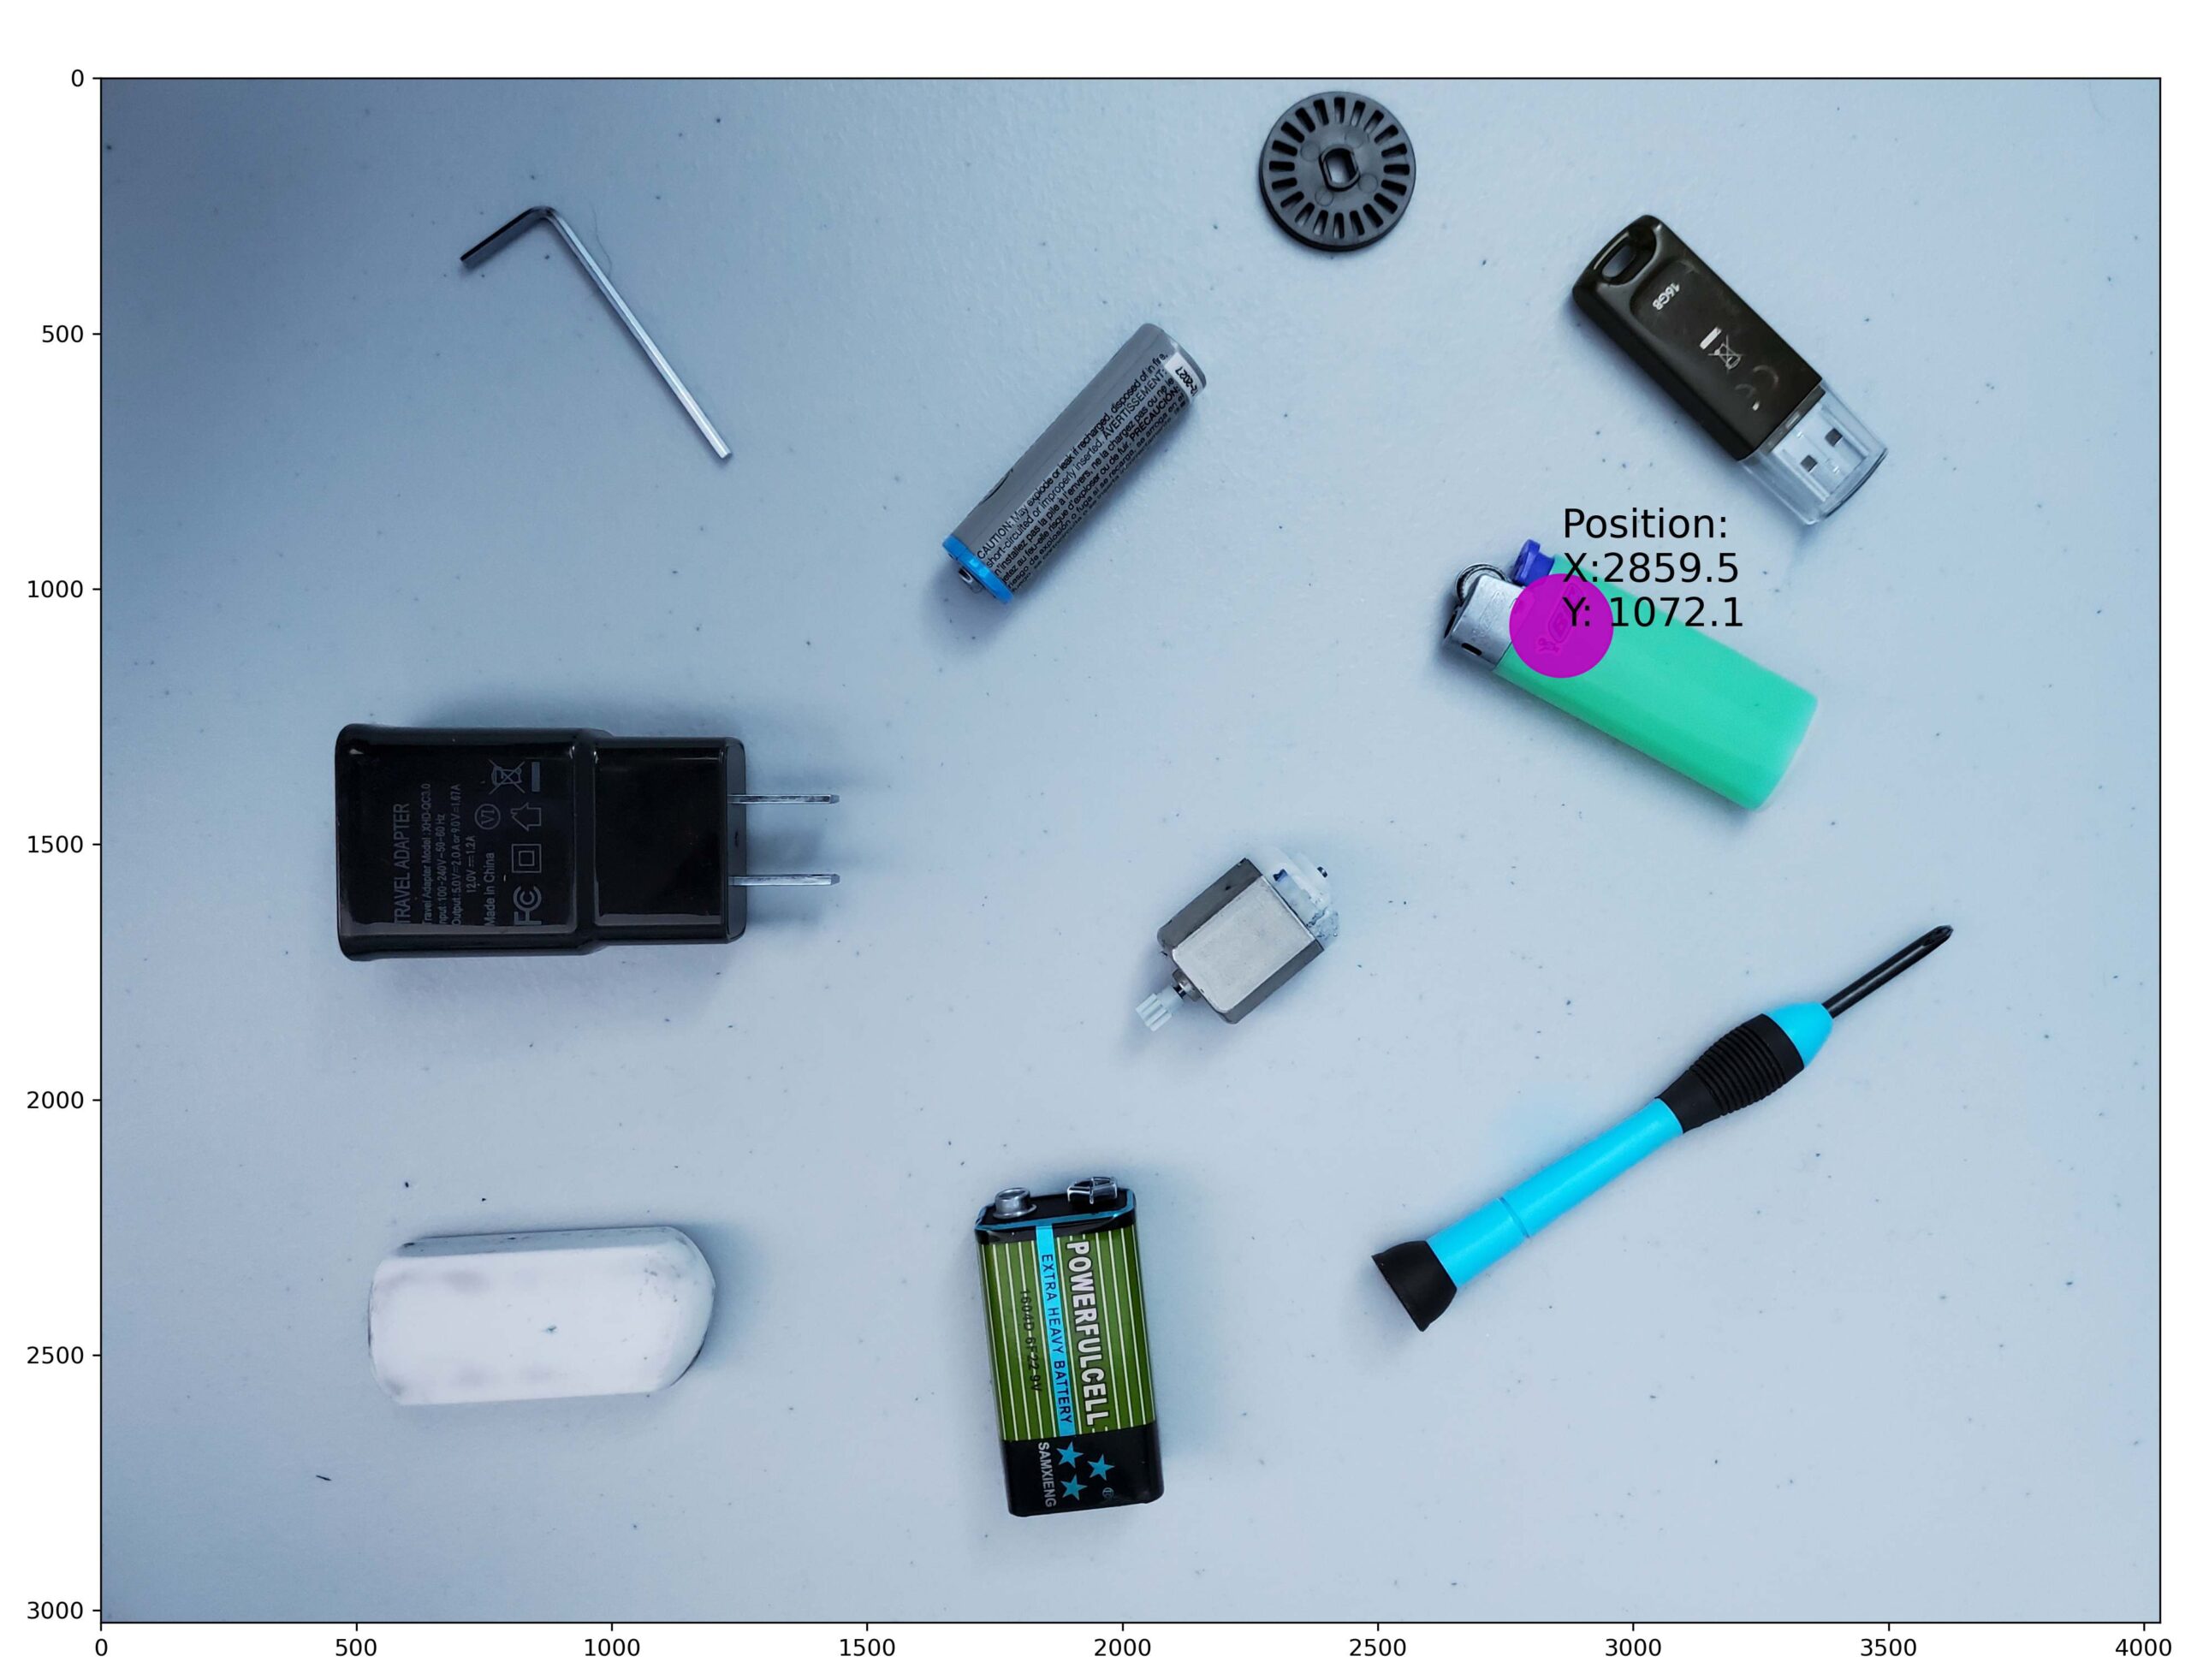
Next, we extract the coordinates of the detected keypoint in the scene image and mark this point on the scene image. This is achieved by using the Python script given below.
# next, we extract the coordinates of the keypoints
# and plot them as circles in the scence

# these two lists are used to store the keypoints
# keypoints of the query image
keyPointsQ=[]
# keypoints of the scence image
keyPointsS=[]

for match in sortedDetectedMatches:

    indexQ = match.queryIdx
    indexS = match.trainIdx

    # extract the coordinates

    (xQ1, yQ1) = keyPointQuery[indexQ].pt
    (xS2, yS2) = keyPointScene[indexS].pt

    keyPointsQ.append((xQ1, yQ1))
    keyPointsS.append((xS2, yS2))


# this is the train image - the image of the scence
sceneImageColor = cv2.imread('scene1.jpg')


stringPosition='Position:'+'\n'+'X:'+('%.1f' %keyPointsS[0][0] ) +'\n' + "Y: "+('%.1f' %keyPointsS[0][1] )

plt.figure(figsize=(16,16))
plt.imshow(sceneImageColor)
circle1=plt.Circle(keyPointsS[0], 100,color='m',alpha=0.9 )
fig = plt.gcf()
ax = fig.gca()
ax.add_patch(circle1)
plt.text(keyPointsS[0][0], keyPointsS[0][1],stringPosition,fontsize='xx-large')
plt.savefig('MarkedImage1.png',dpi=300)
plt.show()
The image with the coordinates of the first matched keypoint is given in the figure below.