 by
by In this Python and OpenCV tutorial, we explain
- How to capture video frames from a camera or webcam in Python and OpenCV, and display them as a video on the computer screen.
- How to apply a simple filter to a captured video frame in real-time and display the image on the computer screen. To demonstrate the application of image filtering in OpenCV, we use a simple Gaussian blur filter that introduces a significant image blur.
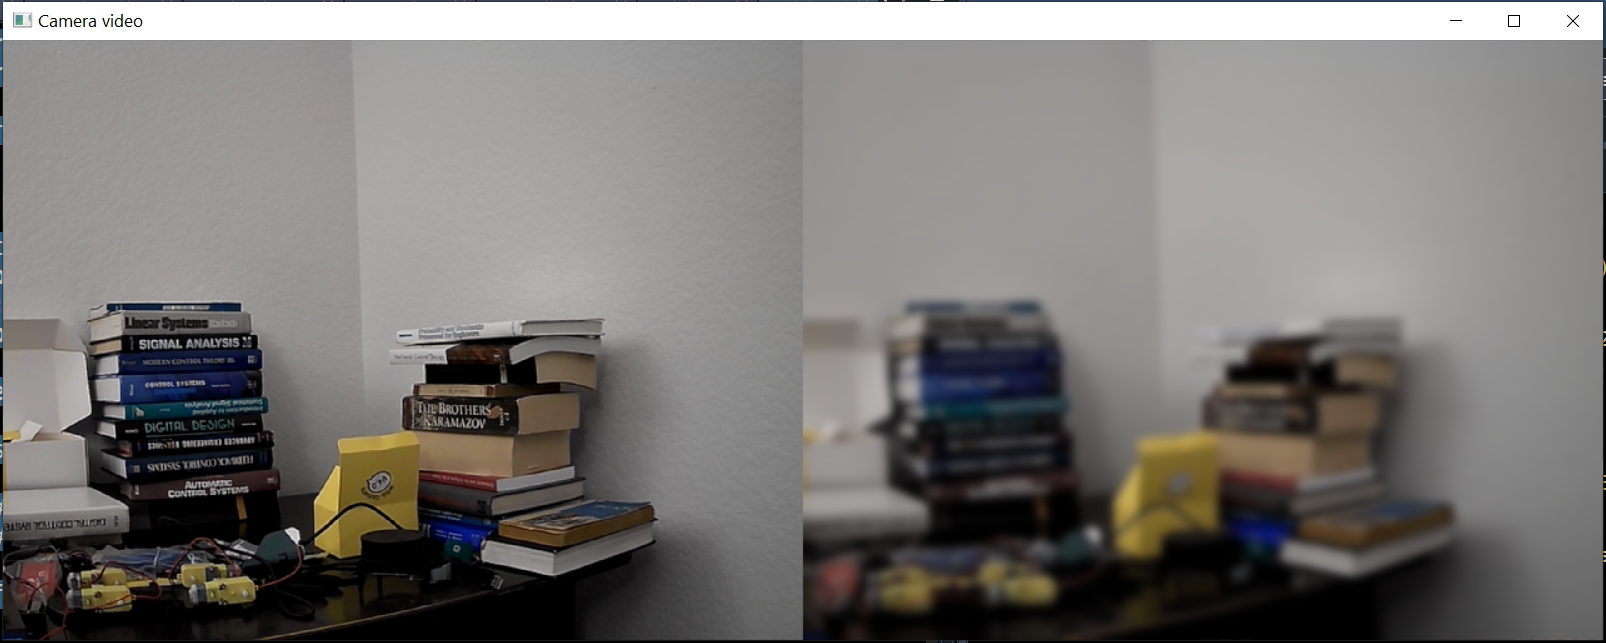
Below, you can see an image recorded by OpenCV and Python. The image on the left is the recorded image, and the image on the right is the filtered recorded image. We filtered the recorded image by using the Gaussian 2D blur filter. This is just a snapshot of the continuous video that is displayed on our computer screen. This webpage tutorial will teach you how to do that. Everything that you will learn in this tutorial can be generalized to more complex problems of real-time object recognition, tracking, and detection.
The YouTube tutorial accompanying this webpage is given below.
First, we need to import the OpenCV and NumPy libraries. Then, we need to create a video capture object for recording the camera frames and double-check if the camera is opened or not. All this is achieved by using the script shown below.
import numpy as np
import cv2

camera = cv2.VideoCapture(0)

if (camera.isOpened()):
    print("The camera is successfully opened")
else:
    print("Could not open the camera")
First, we import NumPy and OpenCV. Then we create a camera capture object by using the function cv2.VideoCapture. The index 0 is an input argument of this function. This is the index of the used camera device. In this tutorial, we use a simple webcam attached to the USB port. Since we have only a single camera attached to the computer USB port, the index is 0. On the other hand, if we would have two cameras and we want to use the second camera, the index would be 1.
The following Python script will read the camera frames, filter them by using the Gaussian blur filter, and display the raw and filtered video next to each other.
while True:

    success,frame=camera.read()

    if not success:
        print("Not able to read the frame. End.")
        break


    frame2 = cv2.GaussianBlur(frame, (23,23), 0)

    combinedImages = np.hstack((frame, frame2))


    cv2.imshow('Camera video',combinedImages)


    if cv2.waitKey(1) == ord('c'):
        break

camera.release()
cv2.destroyAllWindows()
To read the camera frame, we use the function “read()”. The first output of this function is a Boolean variable indicating if the image capture process was successful or not. The second output is the captured frame. We apply the Gaussian blur filter by using this OpenCV function
frame2 = cv2.GaussianBlur(frame, (23,23), 0)The first input argument of the GaussianBlur function is the image (captured frame). The second input argument is a tuple with two entries. The first entry of the tuple is the standard deviation of the Gaussian kernel in the X direction. The second entry of the tuple is the standard deviation of the Gaussian kernel in the Y direction. The third input argument is an indicator for the pixel extrapolation method, for more details see the OpenCV documentation. The output of this function is the filtered image. We horizontally stack the raw and filtered images by using
combinedImages = np.hstack((frame, frame2))We do this since we want to display two videos next to each other. We show the combined image by using
cv2.imshow('Camera video',combinedImages) Then, the following code block is used to end the video capturing process when the user presses the keyboard key “c”
    if cv2.waitKey(1) == ord('c'):
        break
Finally, we end the image recording process and close all the windows by using
camera.release()
cv2.destroyAllWindows()