 by
by In this post, we will learn how to
- Open images in OpenCV
- Display images
- Resize images
- Save images
The YouTube video accompanying this post is given below
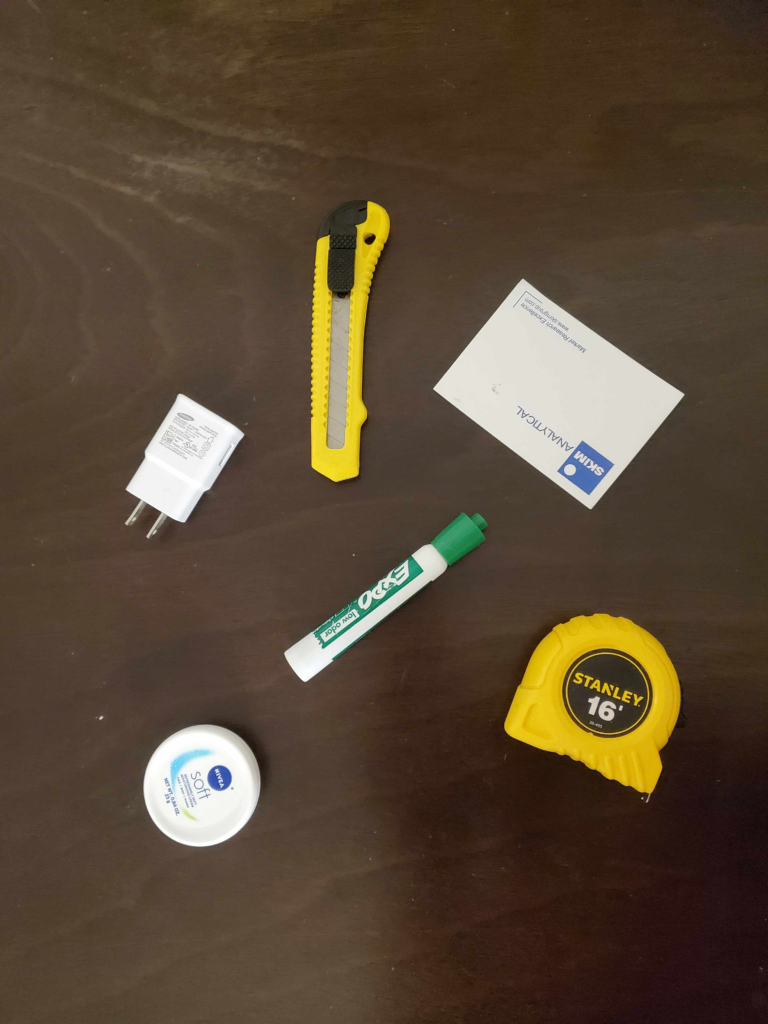
We explain these steps by using the photo shown in the figure below. We took this photo by using a cell phone. You have our permission to download this figure and to use it in your code (right-click on the image and save it to your disk). The name of this image is “partsTest.png”.
We also use the resized image shown below. The name of this image is “resizedParts.png”

Open and Display Images in OpenCV
First, we learn how to open and display images in OpenCV. The following code lines illustrate this
import cv2
from matplotlib import pyplot as plt
import numpy as np

# show the image
# keep in mind that open CV loads images as BGR not RGB
# the image will close if we press any key
image = cv2.imread("resizedParts.png")
cv2.imshow('Image',image)
cv2.waitKey(0)
cv2.destroyAllWindows()
The function cv2.imread() is used to load the image. The image is saved as a numpy.ndarray object. In our case, the name of this object is “image”. If we want to get the dimensions of “image”, we can type
image.shape
The answer will be (806, 604, 3). This means that the image dimension is 806×604, and the number 3 represents three color channels. It should be emphasized that OpenCV loads images in the BGR format, where B stands for blue, G stands for green, and R stands for red. For example, to obtain the color channels at the position (200,200), we can write
image[200,200,:]
The result is array([52, 66, 83], dtype=uint8).
To display the image, we use the function cv2.imshow(). The first argument is the name of the window, and the second argument is the object in which the image is being stored. With the function cv2.waitKey(), we specify for how long the image will be displayed. If we specify cv2.waitKey(0), the image will be displayed until any key is pressed, and this function will return the key that is pressed (Unicode integer that is equivalent to the pressed character). It is important to call the function cv2.destroyAllWindows(). If we do not call this function the program will continue but the image will still be displayed and we will not be able to close the image, that is, our window will crash. To display the image for a certain time interval, we can use the code lines given below
# here, the image will be displayed for 1 second (it can be closed before if we press any key)
cv2.imshow('Image',image)
cv2.waitKey(1000)
cv2.destroyAllWindows()
In this case, the image will be displayed for 1000 milliseconds (1 second), and then it will be automatically closed.
Let us assume that we want to close the image if the letter “c” is pressed, and otherwise we want to keep on displaying the image if any other key is pressed. We can enable this functionality with the following code lines
# here we close the image if a specific key is pressed
# in our case the key is 'c'

finish= False
windowName='Image Window'

while not finish:
    cv2.imshow(windowName,image)
    key=cv2.waitKey(0)

    if key==ord('c'):
        finish=True
        cv2.destroyWindow(windowName)
The function “ord()” takes a character as an input (string of unit length) and returns the Unicode (integer) equivalent of the character.
Resize Images in OpenCV
To resize the image, we use the following code lines
# here we demonstrate how to resize images
imageLarge = cv2.imread("partsTest.png")
cv2.imshow('Image',imageLarge)
cv2.waitKey(0)
cv2.destroyAllWindows()

# scale in percentage
scale=20
newWidth = int(imageLarge.shape[1] * scale / 100)
newHeight = int(imageLarge.shape[0] * scale / 100)
newDimension = (newWidth, newHeight)
# resize image
resizedImage = cv2.resize(imageLarge, newDimension, interpolation = cv2.INTER_AREA)
cv2.imshow('Image',resizedImage)
cv2.waitKey(0)
cv2.destroyAllWindows()
First, we read the large-scale image called “partsTest.png”. Then, we scale the image with a factor of 0.2. Then, we call the function cv2.resize(). We specify the image object, scaled dimensions, and we specify the interpolation method. The interpolation method is necessary since our image will be decreased in dimension so we need to assign the BGR channels to newly formed pixels (some form of averaging).
Save Images
To save images as “*.png” files with various levels of compression, we can use the following code lines
# save image
# save the transformed image
cv2.imwrite("resizedPartsImage.png", resizedImage, [cv2.IMWRITE_PNG_COMPRESSION, 0])
cv2.imwrite("resizedPartsImageCompressedMax.png", resizedImage, [cv2.IMWRITE_PNG_COMPRESSION, 9])
The function cv2.imwrite() is used to save images. The input arguments [cv2.IMWRITE_PNG_COMPRESSION, 0] or [cv2.IMWRITE_PNG_COMPRESSION, 9] specify the compression levels. 0 means no compression, and 9 means maximal compression. Any number between these numbers will specify the compression level.