 by
by
In this control engineering, dynamical systems, and Python scientific computing tutorial, we will learn how to animate the motion of a cart-pendulum system in Python. The animation will be based on the state trajectories obtained by simulating the dynamics of the cart pendulum system. The animation is created by using the Pygame library. Pygame is a powerful Python library for creating computer games. This library can be very useful for simulating the motion of dynamical systems, such as inverted pendulums, mobile robots, and other systems.
The first part of this tutorial is given here. In the first part of the tutorial, we explained how to automatically create a state-space model of the cart-pendulum system and how to simulate the dynamics of this model in Python. Consequently, before you read the tutorial given below we strongly suggest that you first go over the first tutorial part.
The YouTube video accompanying this video tutorial is given below. The GitHub page accompanying this tutorial is given here.
The first part of the tutorial, where we explain how to simulate the dynamics in Python, is given here:
Pygame Animation of the Cart-Pendulum System
The cart-pendulum system is shown below.
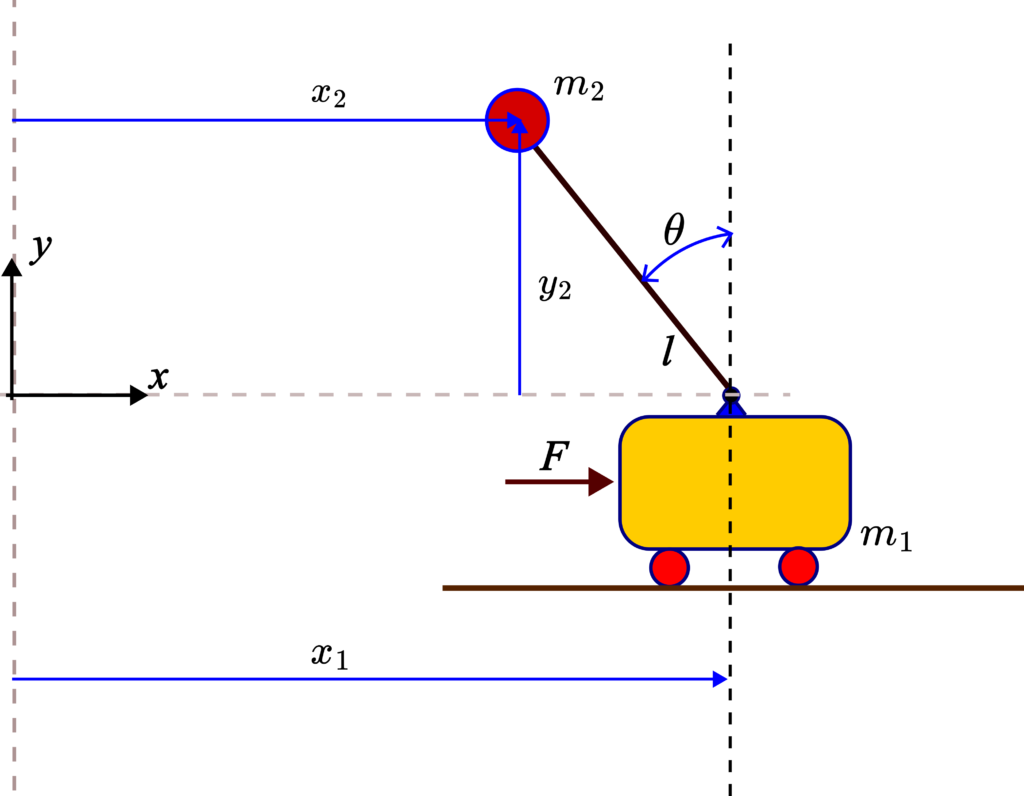
In the first part of the tutorial given here, we explained how to simulate the dynamics of the system. Before running the Python scripts explained in the sequel, it is necessary to run the Python scripts in that tutorial. These Python scripts will generate the simulation results.
The results of this simulation are the time sequences of the cart position  and the pendulum angle
  . This is the only information we need to know in order to animate the dynamics of this system. These time sequences are stored in the file “simulationData.npy”.
The following Python script will import the necessary libraries, set the animation windows size, initialize the Pygame clock, initialize the counter, load the simulation results, and extract the time sequences of  and
and  .
.
import pygame
import numpy as np

# Initialise pygame
pygame.init()

# Set window size
size = width,height = 1600, 800
screen = pygame.display.set_mode(size)
# Clock
clock = pygame.time.Clock()


# this is a frame counter
i=0
# load the simulation data that is computed by simulating the cart-pendulum
# state-space model
solutionArray = np.load('simulationData.npy')

# x coordinate of the cart
x=solutionArray[:,0]
# angle of the pendulum
theta=solutionArray[:,2]
Next, we need to properly scale the variable such that the cart position can be properly visualized in the simulation screen. Namely, the simulated values of are represented in meters. However, the position of objects in the animation screen is represented in screen pixels. Consequently, we need to map to pixels. The idea is to define the following linear transformation between and the pixel position, denoted by  :
:
(1) 
where  is the scaling constant and
  is the offset. We find the constants and by solving the following system of equations
(2) 
where  and
and  are the minimum and maximum position of the cart in the animation window, and
  and
and  are the minimum and maximum values of the time sequence
  . The values of and are determined by the simulation results, and the values of and are determined by the user. The solution of the system of equations is given by
(3) 
Once we have computed the constants and , we compute the cart position in pixels by using (1). The following Python script is used to achieve this task
# here, we need to scale and translate x in order to get x in pixels
maxX=max(x)
minX=min(x)
offsetScreenLimits=500
lB=offsetScreenLimits
uB=width-offsetScreenLimits
scaleX=(uB-lB)/(maxX-minX)
offsetX=lB-scaleX*minX
x=scaleX*x+offsetX
To be able to simulate the cart-pendulum dynamics, we need to properly understand the animation coordinate systems. The coordinate system orientation together with the cart-pendulum system are shown in the figure below.
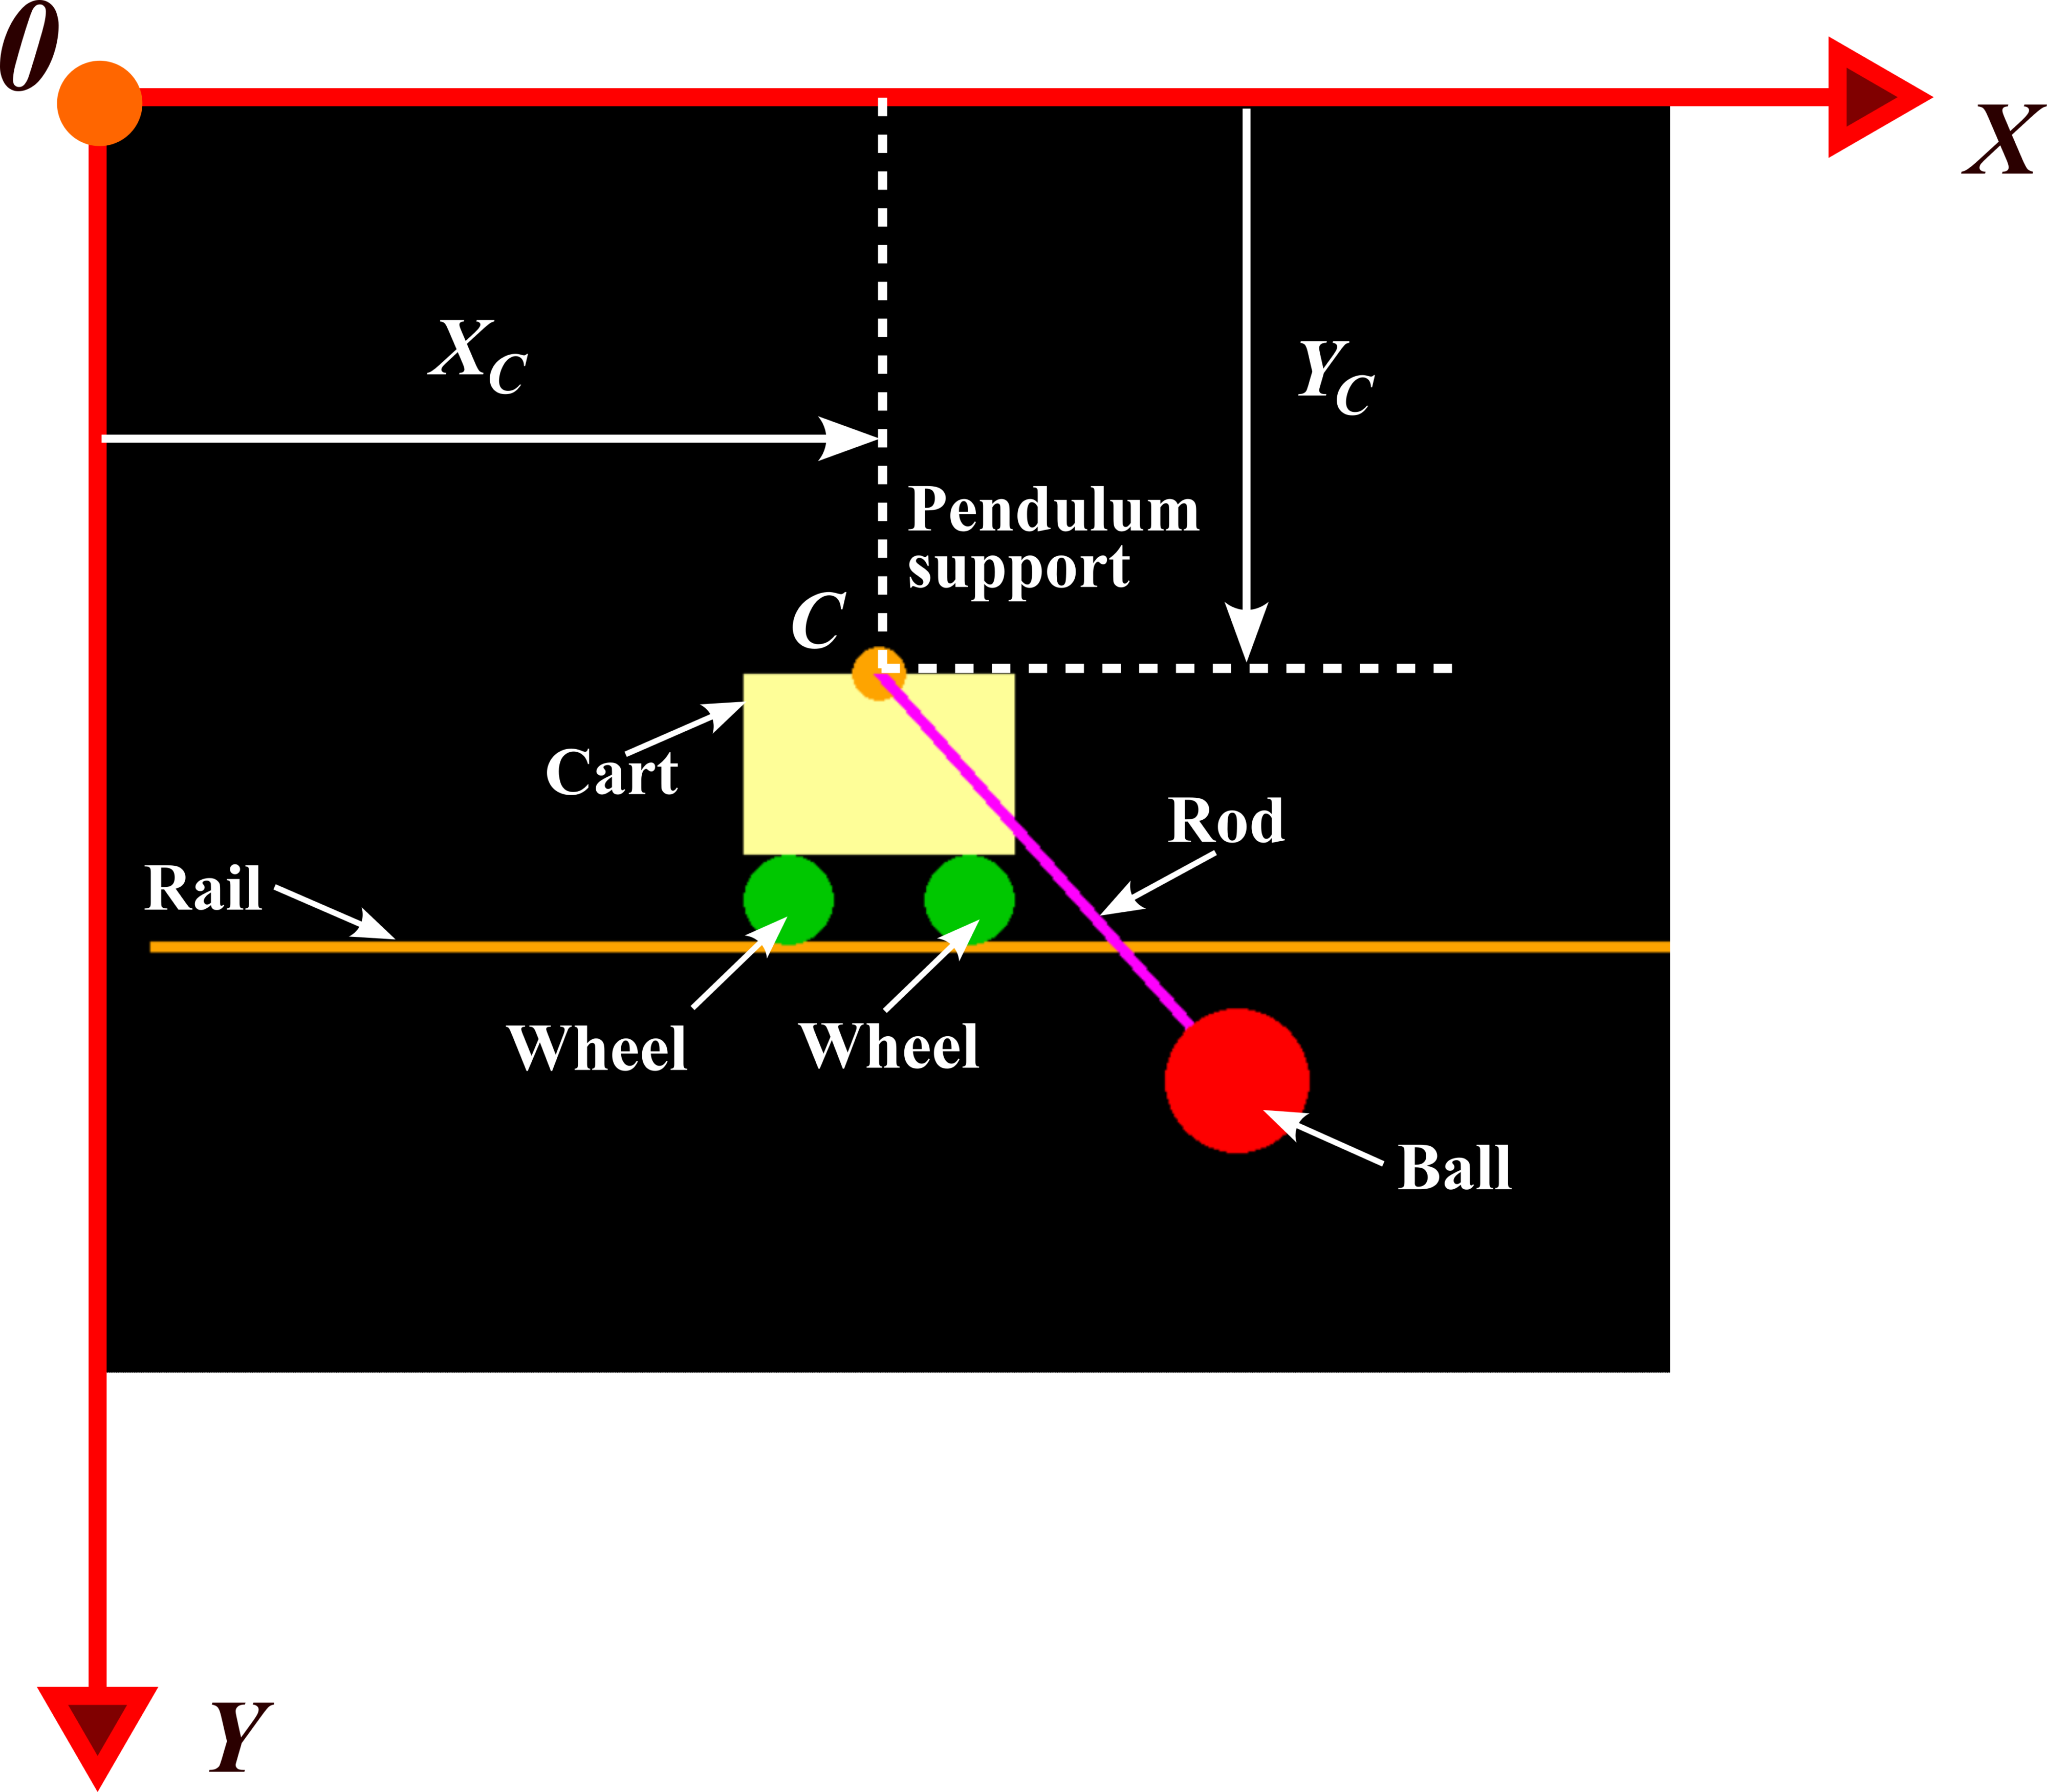
The point  is the center of the circle representing the pendulum support. In our animation, we set
(4) 
That is, the variable obtained by simulating the dynamics is actually the position of the point .
Next, we define the geometrical parameters and colors of components.
# geometrical parameters
# ball radius
ballRadius=40
# cart width and height
cartWidth=150
cartHeight=100
# rod length
rodLength=300
# wheel radius
wheelRadius=25
# pendulum support bearing
pendulumSupportRadius=15
# position of the base point of the cart in the y-direction
yPositionCart=400

# colors
colorRail=(255, 165, 0)
colorCart=(255,255,153)
colorBall=(255, 0, 0)
colorWheels=(0, 200, 0)
colorPendulumSupport=(255, 165, 0)
colorRod=(255,0,255)
The following while loop iterates through the entries of the time sequences and and generates the animation.
# simulation while loop
while (i<len(x)):
     # Close window event
    for event in pygame.event.get():
        if event.type == pygame.QUIT:
            running = True

    # Background Color
    screen.fill((0, 0, 0))

    # point C -base point of the cart
    xC=x[i]
    yC=yPositionCart

    # draw the rail
    pygame.draw.line(screen,colorRail,
                     (int(min(x)-300),int(yC+cartHeight+2*wheelRadius)),
                     (int(max(x)+300), int(yC+cartHeight+2*wheelRadius)),6)

    #draw the cart
    pygame.draw.rect(screen,colorCart,
                     (int(xC-cartWidth/2), yC, cartWidth, cartHeight))

    #draw the pendulum circle support - rotation support

    pygame.draw.circle(screen,colorPendulumSupport,(int(xC)
                                           ,int(yC)),
                                           pendulumSupportRadius)

    #draw the cart wheels
    # left wheel
    pygame.draw.circle(screen,colorWheels,(int(xC-cartWidth/2+wheelRadius)
                                           ,int(yC+cartHeight+wheelRadius)),
                                           wheelRadius)
    # right wheel
    pygame.draw.circle(screen,colorWheels,(int(xC+cartWidth/2-wheelRadius)
                                           ,int(yC+cartHeight+wheelRadius)),
                                           wheelRadius)

    #draw the rod
    # end point
    xB=xC-rodLength*np.sin(theta[i])
    yB=yC-rodLength*np.cos(theta[i])
    pygame.draw.line(screen,colorRod,(int(xC),yC ),(int(xB), int(yB)),8)

    # draw the ball
    pygame.draw.circle(screen,colorBall,(int(xB), int(yB)),ballRadius)

    pygame.display.flip()
    # introduce a delay
    pygame.time.delay(1)
    # https://www.pygame.org/docs/ref/time.html#pygame.time.Clock.tick
    clock.tick(100)
    i=i+1

# this is important, run this if the pygame window does not want to close
pygame.quit()
The simulation is composed of the frame. We generate a single frame for every value of the index “i”. The index “i” represents the index of the corresponding entry of . In every frame, we draw the rail, cart, pendulum support, cart wheels, pendulum, and the ball. All the coordinates of the geometrical objects are determined with respect to the coordinates of the point , that is, with respect to . The  coordinate of the point is constant during the animation. The position of the rod and the ball are also determined by the angle . The circles are animated by using the Pygame function “pygame.draw.circle()”. We specify, the color of the circle, its center, and its radius. The cart is animated by using “pygame.draw.rect()”. We specify the color and the coordinates of the left corner, as well as the width and height of the rectangle. The rails is animated by using “pygame.draw.line()”. We specify the color, first and end points, as well as the line thickness. The input of every Pygame function for animating geometrical objects is the reference to the screen object that is used for animating the objects. At the end, we call “pygame.quit()” to close the animation window. For a complete explanation of the presented Python scripts, see the YouTube tutorial given at the top of this webpage.