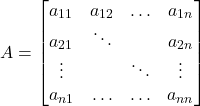
In this tutorial, we teach you how to write, or better to say, type vectors and matrices in LaTeX. The YouTube tutorial accompanying this post is given below.
Prerequisites
To be able to reproduce the LaTeX code presented in this tutorial, you need a LaTeX editor and a LaTeX template. The LaTeX template can be found on our GitHub page, and you can watch this video to learn how to install a LaTeX editor.
If you are using other Latex templates, then make sure that the following packages are included
\usepackage{amssymb,amsmath}
Vectors in LaTeX
First, we learn how to type vectors in LaTeX. Let us learn how to write the following vector
(1) 
The LaTex source code is given below.

Usually, in scientific articles and papers, vectors are denoted by bold fonts. That is the main reason why we use “mathbf” LaTeX command to type vectors. The vector brackets are produced by using “bmatrix” environment (enclosed by begin and end statements). To produce a new row in a vector, we use the notation “\\”.
Often, in the definition of vectors, you need to use vertical dots. For example, consider this vector
(2) 
To produce the vertical dots, we use “vdots” LaTeX command. The source code is given below.

We can produce row vectors by typing
(3) ![]()
The LaTeX source code is given below

Next, let us explain how to add horizontal dots. For example, consider the following vector
(4) ![]()
The source code is given below

Matrices in LaTeX
Matrices in LaTeX can be written in a similar way to vectors. We use the “bmatrix” environment. We start a new row by typing “\\”, and we start a new column by typing “&”.
Consider the following matrix
(5) 
The LaTeX source code is given below

Often, you will need to add diagonal dots to matrix definitions. We can do that, by using “ddots” LaTeX command. For example, consider the following matrix
(6) 
The LaTeX source code is given below

Finally, let us learn another LaTeX command. This is an underbrace command. This command is very useful for writing effective equations. Consider the following expression.
(7) 
The source code is given below
