In this tutorial, we explain the basics of the Robot Operating System (ROS) and Turtlesim simulator. Turtlesim is a simple application (called package by using the ROS terminology) that is designed for learning the basic concepts of ROS. It demonstrates the basic principles of ROS and gives you an overview of how ROS is used in real-life robotic systems. The YouTube video accompanying this post is given below.
Basic Concepts of ROS
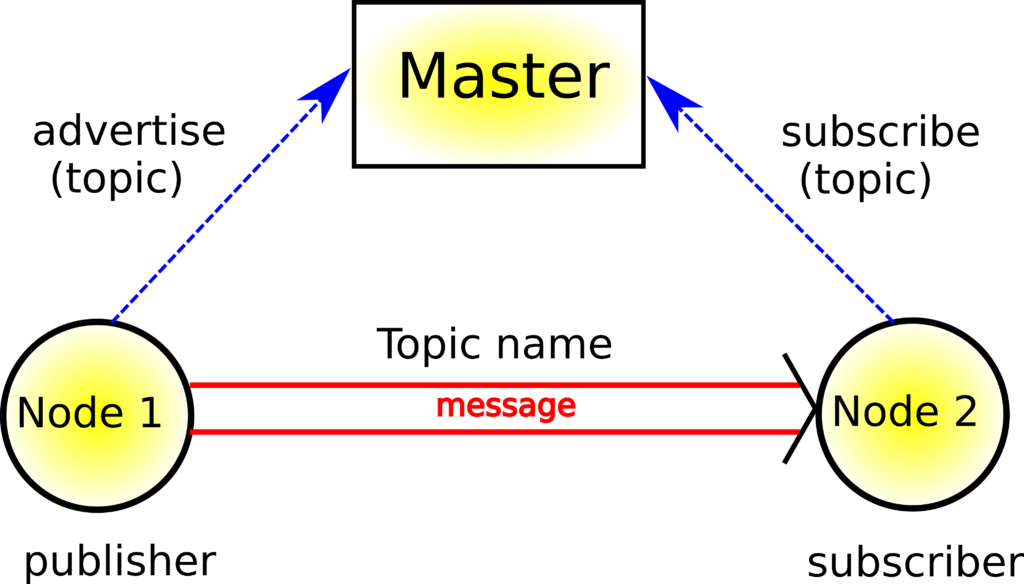
Before we explain how to use the ROS on a Turtlesim simulator, it is first important to introduce and explain the basic ROS terminology, such that you can fully understand all the implementation steps presented later on in this tutorial. The block diagram below summarizes the main working principle of the ROS communication system.

Node– According to the ROS documentation, nodes are processes that perform computations. They are able to communicate with other nodes by using topics, services, and the Parameter Server. In this tutorial, we will only explain topics. Services and the Parameter Server will be explained in the future tutorials. In practice and in real-life robotic systems, nodes can be
- A process or a program that controls a laser range-finder or a distance sensor
- A program that controls a servo motor of a robotic joint
- A program implementing an algorithm for path planning or obstacle avoidance
- A program (driver) receiving information from a camera
- Other programs responsible for other hardware components, preprocesses, and algorithms.
Nodes can communicate with each other. For example, a node (program) can be designed to read information from a distance sensor. This node can send its reading (information or message) to another node whose purpose can be to filter the received information and to calculate a control reference signal that is used to control a servo motor that moves a robotic joint. Nodes communicate with each other by using topics.
Topics– according to the ROS documentation, topics are named buses that are used to exchange messages. Loosely speaking, they can be seen as channels that are used to send/receive information in form of messages that can be strings, numbers, or some other data structures. Topics have names that describe the type and purpose of messages being sent. A publisher node sends out a message by publishing it to the desired/appropriate topic. Another subscriber node will subscribe to this topic. For example, in the case of a node reading the information from a distance sensor, and the node controlling the servo motor, the node responsible for the distance sensor is the publisher node, and the node controlling the servo-motor is the subscriber node. The topic name can be for example “distance sensor information”. The messages are series of floats describing the distance of the robot to an obstacle. In the most general case, the published and subscriber nodes are not aware of each other. That is, topics implement anonymous way of communicating between nodes. A topic is a message bus, and any node can connect to this bus to send/receive messages.
Master– according to the ROS documentation, the ROS Master enables naming and registration services to all the nodes in the ROS system. It keeps a track of publishers and subscribers to certain topics and services. That is, it ensures that nodes are properly connected to topics.
For example, the node responsible for the distance sensor has to tell to the ROS Master that it wants to publish sensor information to the topic “distance sensor information”. It can send the sensor information to this topic. However, on the other end there is no subscriber to this topic, so information will not be sent. Then, the node responsible for the servo-motor has also to tell to the ROS Master that it wants to subscribe to the topic “distance sensor information”. After both publisher and subscriber nodes are registered by the ROS Master to the desired topic, the communication can start.
Turtlesim Simulator
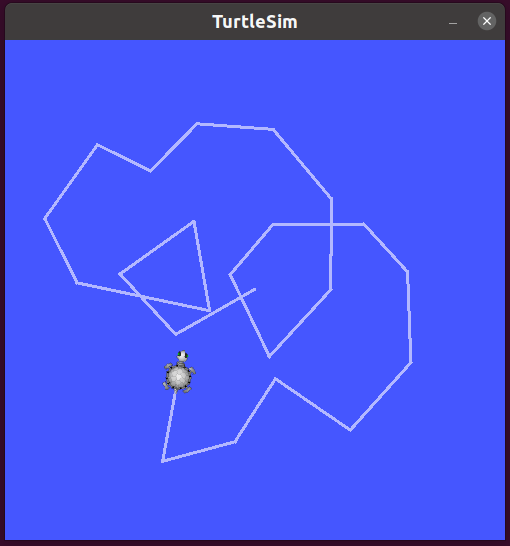
Turtlesim simulator is a great tool for learning the basic concepts of ROS. It simulates three degrees of freedom robot that can move in the plane and that can rotate around the axis perpendicular to the plane. The simulator window is shown below.

The gray line is the trajectory of the turtle. By using arrows we can move the turtle or rotate it.
To run the Turtlesim, we first need to start the ROS Master. We do that by opening a new terminal window (first terminal) and by typing:
roscore
The output should look like this
$roscore
... logging to /home/aleksandar/.ros/log/6035d94a-f683-11ed-8b00-7b5a71dc6777/roslaunch-aleksandar-8324.log
Checking log directory for disk usage. This may take a while.
Press Ctrl-C to interrupt
Done checking log file disk usage. Usage is <1GB.

started roslaunch server http://aleksandar:33547/
ros_comm version 1.16.0


SUMMARY
========

PARAMETERS
 * /rosdistro: noetic
 * /rosversion: 1.16.0

NODES

auto-starting new master
process[master]: started with pid [8335]
ROS_MASTER_URI=http://aleksandar:11311/

setting /run_id to 6035d94a-f683-11ed-8b00-7b5a71dc6777
process[rosout-1]: started with pid [8345]
started core service [/rosout]
The next step is to run the Turtlesim node. We can do that by opening a new terminal (second terminal) and by typing
rosrun turtlesim turtlesim_node
This will produce the following output
~ $rosrun turtlesim turtlesim_node
[ INFO] [1684528068.252813132]: Starting turtlesim with node name /turtlesim
[ INFO] [1684528068.255347521]: Spawning turtle [turtle1] at x=[5.544445], y=[5.544445], theta=[0.000000]
and it will bring the Turtlesim window that is shown in Fig. 2 above. However, we still cannot move the turtle. This is because we need to create another node that will be used to control the turtle. We create this node by opening a new terminal (third terminal) and by typing in the command line:
rosrun turtlesim turtle_teleop_key
This will produce the following output.
~ $ rosrun turtlesim turtle_teleop_key
Reading from keyboard
---------------------------
Use arrow keys to move the turtle. 'q' to quit.
and enable us to move the turtle by using the arrows. Note that the terminal in which we executed this command has to be active in order to be able to move the turtle.
So what is actually happening here? Usually, when people make tutorials they do not thoroughly explain what is actually happening behind scenes. In contrast, we will try to provide a solid explanation.
Let us open a new terminal (fourth terminal), and let us write
rosnode list
This command lists all the running nodes. We obtain the following output
/rosout
/teleop_turtle
/turtlesim
- rosout is the node that is a console log reporting mechanism in ROS.
- teleop_turtle is the node used to listen the pressed keyboard keys and to interpret them and send the appropriate control actions to the turtlesim node. That is, teleop_turtle and turtlesim nodes are communicating with each other over an appropriate topic that will be revealed later on. More precisely, “teleop_turtle” is publishing entered keyboard keys on a topic, and turtlesim subscribes to the same topic in order to receive the entered keys.
- turtlesim is the node that is our actual turtle that we see on the simulation screen.
We can reveal more information about the particular node by typing:
rosnode info /turtlesim
and we obtain the following output
 $rosnode info /turtlesim
--------------------------------------------------------------------------------
Node [/turtlesim]
Publications:
 * /rosout [rosgraph_msgs/Log]
 * /turtle1/color_sensor [turtlesim/Color]
 * /turtle1/pose [turtlesim/Pose]

Subscriptions:
 * /turtle1/cmd_vel [geometry_msgs/Twist]

Services:
 * /clear
 * /kill
 * /reset
 * /spawn
 * /turtle1/set_pen
 * /turtle1/teleport_absolute
 * /turtle1/teleport_relative
 * /turtlesim/get_loggers
 * /turtlesim/set_logger_level


contacting node http://aleksandar:45879/ ...
Pid: 13487
Connections:
 * topic: /rosout
    * to: /rosout
    * direction: outbound (38945 - 127.0.0.1:58594) [29]
    * transport: TCPROS
 * topic: /turtle1/cmd_vel
    * to: /teleop_turtle (http://aleksandar:46551/)
    * direction: inbound (44990 - aleksandar:46961) [31]
    * transport: TCPROS
We can see the topics to which this node publishes and subscribes. It subscribes to the topic /cmd_vel, and this is the topic used to transfer the information about the pressed keys from the node “teleop_turtle ” to the “turtlesim” node. We also see that this node has several services. More about these services in our next tutorial. Similarly, if we type
rosnode info /teleop_turtle
we obtain the following response
Node [/teleop_turtle]
Publications:
 * /rosout [rosgraph_msgs/Log]
 * /turtle1/cmd_vel [geometry_msgs/Twist]

Subscriptions: None

Services:
 * /teleop_turtle/get_loggers
 * /teleop_turtle/set_logger_level


contacting node http://aleksandar:46551/ ...
Pid: 13538
Connections:
 * topic: /rosout
    * to: /rosout
    * direction: outbound (46961 - 127.0.0.1:44984) [12]
    * transport: TCPROS
 * topic: /turtle1/cmd_vel
    * to: /turtlesim
    * direction: outbound (46961 - 127.0.0.1:44990) [10]
    * transport: TCPROS
We can see that this node published to the topic called “/turtle1/cmd_vel”.
Next, let us generate a dynamic graph of what is happening behind the scenes. Open a new terminal (fifth terminal) and type
rosrun rqt_graph rqt_graph
This command will produce a node graph that you can see below.

From this graph, we can clearly observe what is happening behind the scenes. The node “teleop_turtle” is publishing messages to the topic called “/turtle1/cmd_vel” and the node “turtlesim” is subscribed to this topic and receives messages.
We can see a complete list of topics by typing
rostopic list -v
The output is
Published topics:
 * /rosout_agg [rosgraph_msgs/Log] 1 publisher
 * /rosout [rosgraph_msgs/Log] 3 publishers
 * /turtle1/pose [turtlesim/Pose] 1 publisher
 * /turtle1/color_sensor [turtlesim/Color] 1 publisher
 * /turtle1/cmd_vel [geometry_msgs/Twist] 1 publisher

Subscribed topics:
 * /rosout [rosgraph_msgs/Log] 1 subscriber
 * /turtle1/cmd_vel [geometry_msgs/Twist] 1 subscriber
 * /statistics [rosgraph_msgs/TopicStatistics] 1 subscriber
Next, let us investigate further messages that are sent to the topic “/turtle1/cmd_vel “. If we type
rostopic type /turtle1/cmd_vel
we obtain the following response
geometry_msgs/Twist
So the type of the message being transmitted is “geometry_msgs/Twist”. Let us obtain more information about this message. We can do that by typing in the command line
rosmsg show geometry_msgs/Twist
The output is
geometry_msgs/Vector3 linear
  float64 x
  float64 y
  float64 z
geometry_msgs/Vector3 angular
  float64 x
  float64 y
  float64 z
This means that the messages consist of 6 float variables. According to the ROS documentation, “ geometry_msgs/Twist” is a velocity vector in free space with linear and angular components. More about this in our next tutorial.