In this C++ tutorial, we explain how to properly implement and separate C++ classes into header and implementation files. The YouTube tutorial accompanying this webpage tutorial is given below.


Reasons and Best Practices for Implementing C++ Classes and Separating them Into Header (Interface) and Implementation Files
- A good practice for creating disciplined and reusable code is to separate different program components and classes into different files and to compile them separately. Then, we can link them later on to create the final program.
- The idea is to compile a class only once and to use it in different programs similarly to the predefined libraries that are included by #include<iostream> and #include<string>.
- Then, if we change a particular class implementation, then we just need to recompile the class implementation file we changed and not the complete program. On the other hand, if all the classes are included in a single program file when a small part of the program is changed we need to recompile everything, and this might take a significant amount of time.
- Another good practice that we will precisely describe later on, is to split a class into two files. The first file will briefly describe what the class is doing, and the second one will implement the class (define the member functions and other class parts).
- Also, by separating the classes into several files, the code becomes cleaner and easier to understand for people who did not write the code and who are supposed to use some parts of our code
How the C++ Code Should be Organized
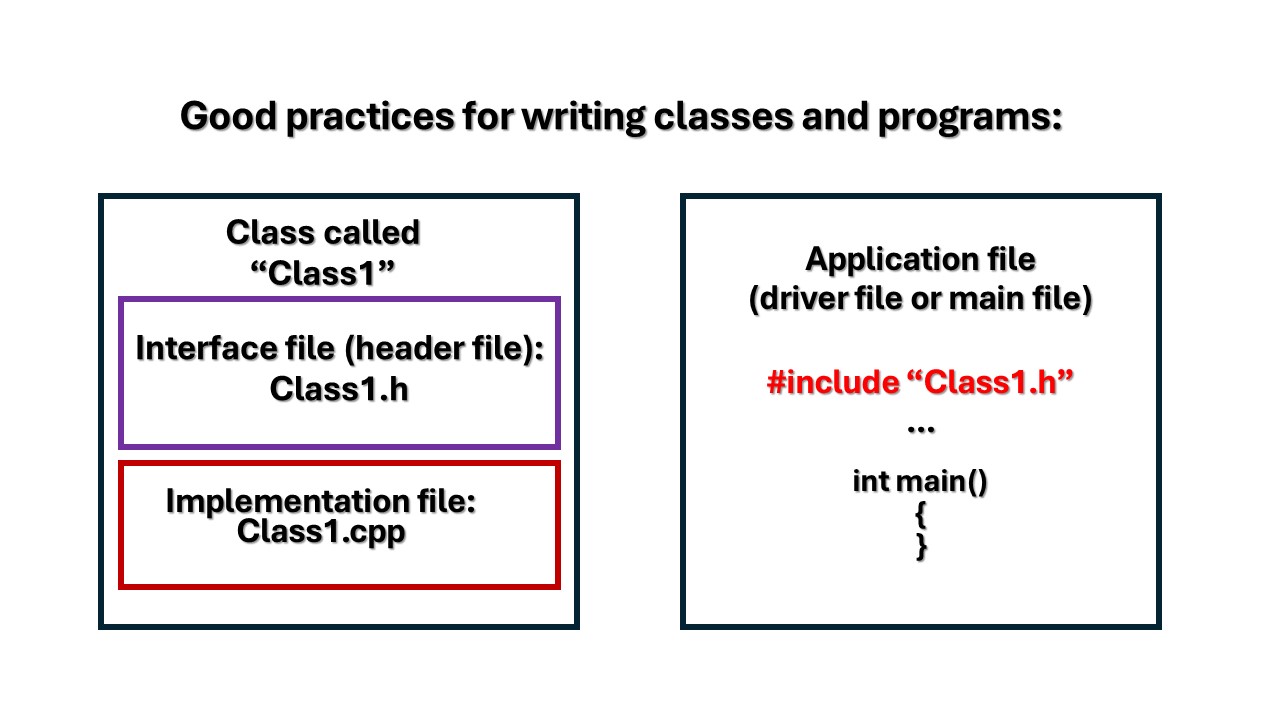
Suppose that we have a program consisting of a single class and a driver program. A good practice that leads to reusable code is to split the program into three files:
- Interface file. The class definition should be placed in a header file with an extension .h or .hpp. This file is called the interface file of the class.
- Implementation file. The definition (implementation) of all class member functions should be placed in another file with an extension “.cpp” (or a similar extension). This file must contain an include directive that includes the header file (interface file) of the class. The interface and implementation file should have the same name and different extensions (for example class1.h and class1.cpp). The implementation file is usually compiled separately from the application file (also known as the driver file or the main file).
- Application file (also known as the driver file or the main file). This file contains the main program and uses the defined class. The application file has to have an include statement “class1.h”. The application file is compiled separately from the implementation file. The compiled files (object files) of the application and implementation files are linked later on.
When we write an include statement, we need to specify if the file to be included is predefined that is provided to us, or it is a file that we wrote:
- -For the predefined files, we type #include<>, for example, #include<iostream>, #include<string>, #include<cstdlib>. That is, we use the angle bracket <>
- -For the header files we defined, we type #include “class1.h” , where class1.h is the header file we defined. That is, we use quotes “”.
It is a tradition to give the same names to the header and implementation files. That is, if the header file is “class1.h”, the implementation file should be “class1.cpp”. We need to compile the implementation and application files, and we do not need to compile the header files since they are included. Both the implementation and application files contain the include directive #include “class1.h”. By compiling the files, the compiler invokes a preprocessor that reads this include statement and whenever it is encountered it replaces it with the content of the file class1.h.
C++ Example on How to Separate a User-Defined Class Into Header (Interface) and Implementation Files
Here, we define a class called “Student”. This class will have two private member variables: student name and student age . Then, we will define a default constructor that will set the name to “No name” and age to 0. Then, we will define a member function that will set the name and age after an object of the class is defined. Finally, we will define a member function that will print the name and the age.
The first step is to define the interface or the header file. The file name should be “Student.h”, and the file is given below
#ifndef STUDENT_H
#define STUDENT_H
#include<iostream>
#include<cstdlib>
#include<string>

using namespace std;

class Student
{
    public:
        // This constructor will set studentName to "No name" and studentAge to 0
        Student();
        // This function sets studentName=name, studentAge=age, once the object is constructed
        void SetNameAge(string name, int age);
        // This function will print studentName and studentAge
        void PrintNameAge();

    private:
        string studentName;
        int studentAge;
};


#endif
Next, we need to write the implementation file. We call this file “Student.cpp”. The file is given below.
#include<iostream>
#include<string>
#include<cstdlib>

#include "Student.h"

using namespace std;

Student::Student()
{
        studentName="No Name";
        studentAge=0;
}

 void Student::SetNameAge(string name, int age)
 {
    studentName=name;
    studentAge=age;
 }

 void Student::PrintNameAge()
 {
    cout<<"Student name is "<<studentName<<endl;
    cout<<"Student age is "<<studentAge<<endl;
 }
Finally, the application file or the main file that is also called as the drive file is given below. We save this file as “applicationFile.cpp”
#include<iostream>
#include<string>
#include<cstdlib>

#include "Student.h"

using namespace std;


int main()
{
    Student Student1;
    Student1.SetNameAge("John Smith", 30);
    Student1.PrintNameAge();
    return 0;
}
To compile all the files and to create an executable file, save all the files in the same folder and then open a terminal (Windows Command Prompt), and navigate to the folder containing the files. Then type
g++ *.cpp -o outputThis will compile all the cpp files (Student.cpp and applicationFile.cpp) and it link the compiled files and create an executable file called “output.exe”. Then you can execute this file by typing in the terminal “output”. This will run the program. The output should be:
Student name is John Smith
Student age is 30